This image shows a close-up view of a stone wall or patio surface. The wall is constructed using irregularly shaped natural stones in various shades of gray, brown, and beige. The stones are arranged in a random, mosaic-like pattern, creating an interesting and textured surface. The stones appear to be a mix of different types of natural stone, such as granite or slate, giving the wall a rustic and earthy appearance.

DIY Flagstone Installation: Tips and Techniques for a Professional Finish

Introduction to Flagstone Installation

Flagstone installation can add a natural charm to any outdoor space. Following five easy steps can help you install them like a pro:

  1. Plan the project: Outline the steps and materials required.
  2. Prepare the area: Clear the site of debris and vegetation, including roots and rocks. Make sure proper drainage is in place.
  3. Lay the base: Compacted base layer of crushed gravel or sand helps avoid shifting.
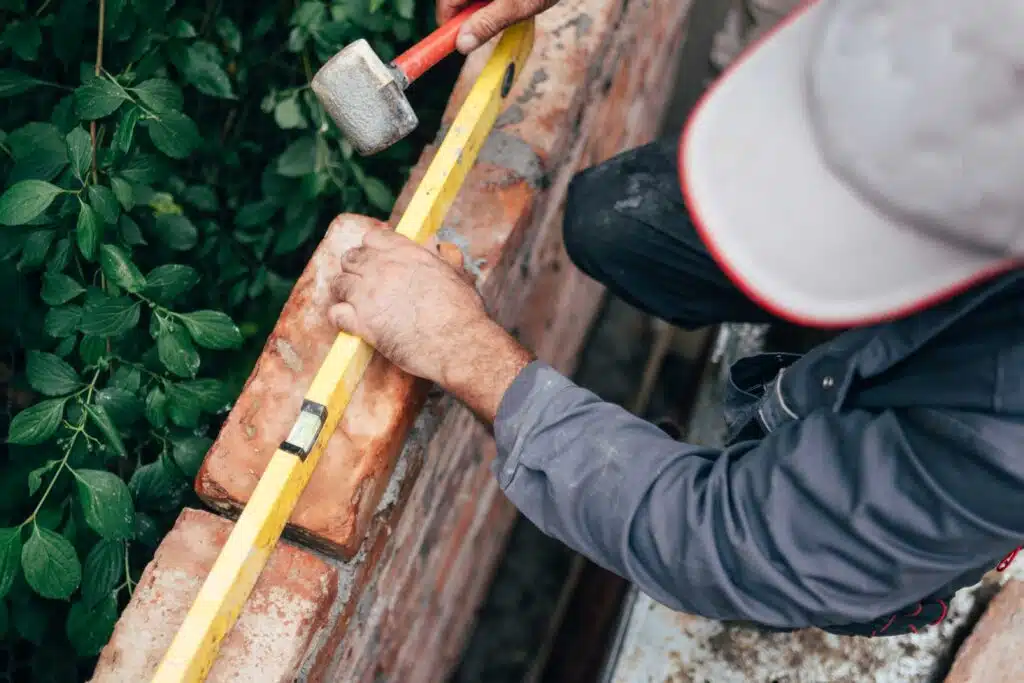
  4. Install your stones: Arrange each stone on the base layer. Tap securely using a rubber mallet.
  5. Finishing touches: Fill gaps with sand/gravel & seal to protect from weather.

Irregular shapes or curves may pose unique challenges. Seek professional help for complex projects.

Size & shape of flagstones must be considered while installation. Complementary colours of landscaping around the area can also enhance its beauty.

Regular maintenance is essential. Sweep away debris & replenish joint material every few years to last for decades.

Begin your DIY Flagstone installation journey with proper planning!

Pre-installation Preparations

Prior to installing flagstone, prepping the area is key! Level the ground and clear all obstructions like roots, rocks, and debris.

Here’s a 5-step guide for pre-installation:

  1. String lines help create even placement of stones.
  2. Compact the ground 4 inches deep with a compactor or tamper.
  3. Spread a layer of bedding sand evenly with a rake.
  4. Water the sand to stabilize and bind it.
  5. Add landscape fabric to prevent future weed growth.

Check for any underground utilities, like plumbing pipes. Visualize where people will walk on the pathway or patio. It’s best to place larger rocks first, and fit smaller stones in between. Grout the gaps for support and stability. Edging pavers or bricks can help the perimeter. Make sure all stones fit before setting them. Once you’ve prepped, your DIY flagstone installation will have a professional finish! Get your tools ready because you need all hands on deck!

Tools and Materials Required for Flagstone Installation

You’ll need some specific tools and materials to get a professional finish when installing flagstone. Here are the essentials:

  • Flagstone – this comes in various thicknesses, sizes, colours and textures.
  • Masonry Saw – a high-quality saw with a diamond blade is needed to cut or shape flagstones.
  • Base Materials – gravel, sand, crushed rock or mortar should be used as a base for laying the flagstones.
  • Work Gear – don’t forget your PPE, such as gloves, goggles and face shields.

You may also want to have a few additional tools, such as chisels, hammers and levels. Jointing compound and sealing solutions will make your work easier and offer more style choices. Plus, check your local regulations for permits or licenses before you start. Flagstone installation requires some serious puzzle-solving skills – time to play Tetris!

Installation Process of Flagstone

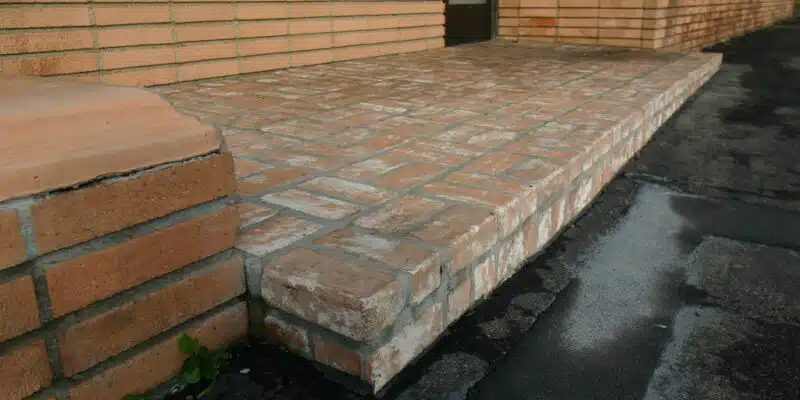
Ready to give your outdoor living area a unique look? Here’s how to lay flagstone pavers the proper way – from preparation to finish!

Start by preparing the ground. Clear away weeds, grass, debris. Level and compact the soil with a tamper or plate compactor.

Next, spread about 4 inches of crushed stone evenly over the soil. Use a rake and shovel to level the stones.

Begin laying the flagstones in a pattern that feels comfortable. Measure and cut stones to fit. Fill in gaps between the stones with polymeric sand or crush granite dust.

Don’t forget to create drainage channels. This will help avoid any water damage to your house foundation.

Finally, schedule yourself plenty of time to complete the project without rushing. Pay attention to detail for a polished finish, just like a professional! Cement will give your flagstone installation a fantastic finish. So get to it and spruce up your outdoor space!

Finishing Touches for a Professional Look

To get a polished and professional look for your DIY flagstone installation, take these steps:

  1. Clean and level the surface. Use a pressure washer to get rid of dirt and debris.
  2. Anchor the stones with edge restraints. Try plastic, metal or wood.
  3. Fill gaps with polymeric sand that hardens when wet. This locks the stones in place.
  4. Seal the flagstones with a specialized sealant. Protects from water damage and gives a glossy look.

Mix colours, shapes and sizes for special designs.

Be sure to do each step correctly. That way, you’ll have a stunning patio lasting for years. Keeping your flagstone looking sharp? Easier than your ex’s razor blades!

Maintenance and Care for Flagstone

Caring and Maintaining Flagstone

To keep your flagstone looking perfect, regular maintenance is a must. Follow these tips to make sure your flagstone stays in good condition:

  1. Clean the flagstone with a solution of mild detergent and water. Don’t use harsh chemicals, as this could damage the stone.
  2. Seal the flagstone every few years to protect it from weathering and staining. Plus, it’ll keep its great look.
  3. Repair any chips or cracks that appear ASAP. This will help maintain its sturdiness.
  4. Avoid contact with substances like oil, grease or acidic liquids. These may stain the surface permanently.

Pro Tip: When sealing, select the right sealer for your type of stone. Different stones require different sealers for the best protection.

Frequently Asked Questions

Q: What materials do I need for a DIY flagstone installation?

A: You will need flagstone, sand, landscape fabric, a shovel, a level, a rubber mallet, and a wheelbarrow.

Q: How do I prepare the area for a flagstone installation?

A: First, mark the area where you want to install the flagstones. Remove any grass or plants and level the area. Lay down landscape fabric to prevent weeds from growing under the flagstones.

Q: What is the best way to lay flagstones?

A: Start at one end of the area and work your way across. Spread a layer of sand and level it with a shovel and a level. Place the flagstone on top and tap it into place with a rubber mallet. Continue this process until all flagstones are laid.

Q: How do I ensure that the flagstones are level?

A: Use a level to ensure that each flagstone is level with the others. Add or remove sand as needed to adjust the height.

Q: Should I use mortar to secure the flagstones in place?

A: It is not necessary to use mortar unless you prefer a more permanent installation. If you choose to use mortar, make sure to apply it in small sections to prevent it from drying before you lay the flagstones.

Q: How do I maintain my flagstone installation?

A: Sweep the flagstones regularly to prevent debris from accumulating and staining them. If necessary, you can use a pressure washer to clean them.

The Benefits of a Brick Porch for Your Home’s Curb Appeal

Introduction

Want to add value and durability to your home? A brick porch is the answer! Low maintenance and great weather resistance, it can last for decades. Plus, it gives your property an elegant, classic look. And, unlike wood or concrete, brick won’t rot, warp or corrode.

Choose from different patterns and colors to match your home’s style. From herringbone and basket weave to earthy tones and pops of color, there’s something for everyone. Add pergolas or awnings for a bit of shade and comfort.

Finally, hire professional masonry contractors. They’ll ensure precise installation and help you achieve the desired finish- instantly boosting your home’s curb appeal!

Why a Brick Porch is Great for Curb Appeal

Brick Porch: Boost Your Home’s Curb Appeal

A brick porch is an excellent way to enhance the curb appeal of your home. It not only adds charm and character to the exterior of your home, but it also serves as an inviting entryway. Brick porches are durable and require minimal maintenance, making them a perfect choice for homeowners who want an appealing and long-lasting entrance to their home.

A brick porch provides a classic and timeless look that can blend seamlessly with any architectural style. It also offers a range of design options, from traditional to modern, making it easier to customize your porch to your liking. The various brick patterns and colors available allow you to select one that complements the overall look of your home.

Aside from its aesthetic appeal, a brick porch is also an investment in the value of your home. It adds to the visual appeal of your property, attracting potential buyers. Moreover, a well-built brick porch can increase the overall value of your property if you ever plan to sell your house.

Incorporating a brick porch into your home’s exterior is a smart decision that can increase the value of your property while improving its appearance. Don’t miss out on this opportunity to enhance your home’s curb appeal!

Who needs Botox when you can give your home a facelift with a beautiful brick porch?

Enhances Home Appearance

A brick porch has beauty beyond the surface. It adds depth and dimension to a home’s exterior, plus enhances its style. Crafting a porch with brick gives warmth, texture, and visual appeal plus adds value to the property.

Brick is permanent and requires little maintenance. It gets more charming with age plus offers cost savings.

A brick porch also provides safety and traction in bad weather. It supports heavy outdoor furniture and potted plants. Design elements like columns, railings, steps, and archways give personality and functionality. Mix traditional and modern touches for a stunning area that fits your tastes.

Investing in a brick porch is an excellent way to get long-term curb appeal. With charm, practicality, and detailing options, it’s no wonder they remain popular with homeowners. Get it now and outlast your ex’s grudges!

Durable and Long-Lasting

Brick porches are known for being dependable and long-lasting. They require minimal upkeep and can withstand tough weather, high foot traffic, and wear and tear. Plus, they last a long time!

Plus, there are tons of styles and designs that fit any home. Classic or modern, brick porches add charm and an inviting atmosphere to your property.

Moreover, brick porches have unique features. Fire-resistant and offering better insulation than other materials, they require less upkeep than wood or concrete porches. This makes them incredibly cost-effective.

In conclusion, a brick porch is a great investment; it looks great and is easy to maintain. Consider adding one today and enjoy the benefits!

Easy to Maintain

Maintaining a brick porch is so easy! It’s durable and sturdy, with no need to worry about rust, moisture or insects. A simple soap and water clean is enough to keep it looking great. Plus, its smooth surface means no yearly sealing, staining or painting is needed – saving time and money.

Uniquely, the brick porch won’t crack or chip. Its interlocking design and rough texture offer a safer option than other materials. And, a study by The National Association of Home Builders found that 90% of homebuyers prefer homes with brick detailing.

Investing in a brick porch gives great curb appeal, and lower maintenance requirements for years to come. Plus, it’s like a blank canvas – awaiting your personal touch. Just imagine a giant flamingo statue in your front yard!

Versatile in Design

Porch Bricks: The Chameleon of Design.

A brick porch is an impressive design option for any home’s exterior. It blends with different architectural designs and can be tailored to match any homeowner’s tastes.

For example:

Column 1Column 2Column 3
Architectural StyleBrick TypeColor Options
Colonial RevivalStandard Modular BrickTraditional Red, Black and Brown
Mediterranean RevivalTumbled Brick PaversRustic Earth Tones, Terracotta
Craftsman StyleExtruded Brick Clay TilesModern Gray, Creamy Neutrals or Multi-Color Blend

Bricks can also be laid in various ways. Horizontally, vertically or even in intricate patterns!

Plus, they’re incredibly durable and timeless, adding value to your home. Low maintenance costs compared to wood decks, concrete patios and vinyl railings make them even more appealing.

A personal story was once shared about a family’s love for their brick porch. Grandma used to tend to her flowers every morning, before relaxing in her rocking chair, appreciating her lawn’s view with a peaceful smile. This is why Porch Bricks have stood the test of time as a preferred building material.

Adding a brick porch to your home not only increases curb appeal but also provides the perfect spot for judging your neighbours’ lawn ornaments.

Benefits of Adding a Brick Porch to Your Home

A Brick Porch Adds Value to Your Home

A brick porch is an excellent addition to your home, as it enhances the curb appeal of the property, augments outdoor living space, and provides a welcoming entryway. It also creates a defined, stylish transition space between indoors and outdoors.

Here are the four benefits of adding a brick porch to your home:

  • It adds value to your home. Brick porch installation is an investment that can pay off in the long run, as it boosts your home’s resale value.
  • It enhances curb appeal. A brick porch creates a stunning visual impact, giving your home a polished look that stands out among the neighborhood homes.
  • It serves as an outdoor living space. A brick porch is a versatile outdoor space that can be used for relaxing, entertaining, or dining.
  • It provides a welcoming entryway. A brick porch adds a warm and inviting touch to your home, welcoming guests and family alike into your abode.

It is important to note that brick porches require minimal maintenance and are incredibly durable. The masonry brick material is easy to clean and is resistant to wear and tear, making it a long-lasting solution.

Add a Brick Porch to Your Home Today

Do not miss out on the benefits of a brick porch for your home. It is an investment worth considering to improve your property value, enhance curb appeal, increase living space, and add a welcoming entryway. Consult with a masonry expert today to learn more about the right brick porch design and installation plan for your home.

Brick porches add more value to your home than your ex’s collection of rare vinyls.

Increases Property Value

Adding a brick porch to your home can be a great way to boost its value. It gives your house an inviting entrance, making it look more attractive and adding to its curb appeal. Plus, it’s low-maintenance and durable, so you don’t need to worry about expensive repairs down the line.

John and Alice proved this when they added a porch to their home before putting it on the market. They received multiple offers almost instantly and were able to sell their home quickly and at a higher price. Who knows? Maybe you could do the same! And hey – building the porch might be a great workout too!

Provides a Functional Space for Outdoor Activities

Transform your outdoor space with a brick porch! It’s perfect for entertaining, sipping tea, or just reading.

Brick is durable and requires minimal care. Plus, its solid structure can handle heavy furniture.

Customize with steps and railings for a stylish look that boosts your property value. Build it and watch them come!

Entices Potential Buyers

A brick porch can make your home way more attractive to potential buyers! It creates a great first impression and adds to the curb appeal. Plus, the design options are endless – from classic to modern.

Your porch gives you extra space. You can use it as a sitting area or to store items like shoes and umbrellas. It also protects you from bad weather and increases security too.

Plus, a brick porch is durable and requires little maintenance. Adding extra features like lighting and decorative elements adds even more charm to your property.

Why DIY when you can hire a pro and have time to enjoy a cold one on your new porch?

Hiring a Professional Masonry Contractor

Professional Masonry Contractors for a Successful Brick Porch Installation

Brick porches are a great addition to your house aesthetic. However, to ensure the best results, you need to hire a professional masonry contractor. A reputable contractor will provide consultation, design, and installation services.

During your consultation, the contractor will inspect your premises, discuss your ideas, and provide an estimate of the project’s cost. Afterward, they will provide design ideas that ensure your brick porch meets your preferences and serves your purpose.

To ensure the installation process is seamless, the contractor will also offer a timeline for the project, ensuring you know when to expect the project’s completion. Additionally, reputable contractors have the right equipment to complete the task safely and within the necessary regulations.

To avoid losses and shoddy workmanship, ensure that the contractor is licensed, insured, and experienced. Do not compromise quality for cost. Furthermore, make inquiries to ensure the contractor has a track record of excellence in their projects. Choose prudently, and you will have a beautiful brick porch that will leave everyone envious.

The Importance of Hiring a Professional Masonry Contractor

George Washington University was expanding, and they needed a skilled contractor to replicate their historic buildings’ stonework facades. A company of inexperienced workers got the job, and the product was disastrous. They were unable to recreate the historic design, and the final result was an out-of-country replica. It was a total fiasco that ended up costing the University financially, and ruining their expansion plans.

This emphasizes the essence of hiring a professional masonry contractor for your brick porch’s successful installation. Don’t let your porch become a DIY disaster zone – hire a pro and let them lay the bricks, while you lay back and admire the curb appeal.

Find a Reputable Contractor

Finding a Dependable Masonry Contractor

To get quality masonry work, you need a reliable contractor. Research their expertise, experience, and testimonials. Make sure they’re licensed and insured with competitive rates.

Get the Right Contractor

After figuring out your project needs, pick a mason who specializes in the job. See how they communicate and get detailed quotes to compare prices.

More Tips on Choosing a Qualified Contractor

  • Get references from people you know and check legal compliance using regulatory platforms.
  • Look for an experienced contractor with good customer service.

Pro Tip:

Interview them to test their problem-solving skills, material knowledge, and technical proficiency before hiring them. Ask for proof of their past successes before giving them the job.

Ask for References and Past Work

It’s key to ask a masonry contractor for proof of their past work and references. Here are 6 important points to consider when requesting references:

  • Get a portfolio of their most recent jobs.
  • Ask for permission before speaking to their references.
  • Inquire about past projects similar to yours.
  • Request references from professional organizations.
  • Find out if any local clients would be willing to share their experiences.
  • Try not to use subcontractors as it could lead to low-quality work.

You can also search online for reviews. Look at forums, message boards, social media, and review sites like Yelp and Google Reviews. For example, one family was looking for a mason. They asked for 5 references, but only got 4. After checking with the contractor’s impartial representatives, none of the references had great things to say. So, the family decided not to hire them.

It’s best to hire a qualified and insured masonry contractor. DIY disasters might make good YouTube videos, but not good repairs!

Check for License and Insurance

Hunting down a qualified masonry contractor necessitates a lot of digging to guarantee first-rate results. As well as glancing through customer reviews, it’s essential to ensure the contractor’s license and insurance are still valid. Here are four key points to consider:

  • Check with the State Licensing Board: To guarantee credibility, make sure their license is current.
  • Insurance is mandatory: To protect all parties, verify if they possess liability insurance.
  • Worker’s Compensation Insurance: This cover safeguards contractors while working on-site, so you won’t be liable in case of any work-related accidents.
  • Work Guarantee: Request a guarantee that they’ve met all legal requirements and ordinances to stay away from any conflict with local authorities.

It’s crucial to be vigilant when searching for a masonry contractor as some unregistered contractors may offer services at lower costs but not deliver quality workmanship.

By taking heed of these guidelines, you can evade potential obstacles that may occur during renovation or construction projects involving masonry work.

Moreover, going the extra mile by confirming your chosen contractor’s documents guarantees you’ll have peace of mind knowing the job is in safe hands.

Before signing any agreement with a masonry contractor, homeowners or business owners must conduct proper research and assessments to guarantee their needs will be adequately met. Asking for referrals is another great way of finding reliable contractors without putting yourself in danger.

Keep your porch looking pristine with these straightforward upkeep tips, or employ a masonry contractor and never stress about it again.

Maintaining Your Brick Porch

###Maintaining Your Brick Porch

Keeping your brick porch well-maintained is crucial for enhancing its longevity. Here are some essential tips for maintaining your brick porch.

  1. Regular Cleaning: Clean your brick porch regularly using a soft-bristled brush, water, and mild detergent to remove dirt and grime.
  2. Sealing: Ensure that your brick porch is sealed to prevent water infiltration and protect it from damage caused by freeze-thaw cycles.
  3. Repairing Mortar Joints: If you observe any cracks or damage in the mortar joints, immediately repoint the bricks with fresh mortar.
  4. Avoid Pressure Washing: Avoid using high-pressure washing to clean your brick porch as it can damage the bricks and loosen the mortar joints.
  5. Prevent Vegetation Growth: Prevent vegetation growth on your brick porch by trimming nearby trees and shrubs, removing weeds, and tackling any algae or moss buildup.
  6. Periodic Inspections: Carry out periodic inspections to detect any potential issues or damage and take remedial measures before they become bigger problems.

Proper maintenance of your brick porch not only enhances its appearance and durability but also prevents costly repairs in the future.

Ensure that a professional masonry contractor carries out any complex repairs or maintenance work, such as replacing damaged bricks or repointing, to maintain the structural integrity of your porch.

Brick porches have been a significant part of historical architecture, dating back several centuries. With their durability and aesthetic appeal, they have stood the test of time and continue to be a popular choice for homeowners.

Keep your brick porch in top shape with regular cleaning and maintenance – it’s the only way to ensure it doesn’t become a crumbling eyesore.

Regular Cleaning and Maintenance

Keeping your brick porch looking its best requires regular cleaning and maintenance. Follow these 6 steps for top-notch care:

  1. Clear any debris like leaves, branches, cobwebs, and dirt.
  2. Scrub with a soap and water solution.
  3. Rinse thoroughly until all soap residue is gone.
  4. Check the bricks for signs of wear or damage.
  5. Fill in small gaps with fresh mortar and larger cracks with proper repair.
  6. Schedule an annual inspection and maintenance routine.

Use mild detergents when cleaning. Replace any bricks that are outdated or beyond repair. This will help keep your porch looking stunning for years!

Research shows that outdoor living spaces are the most popular remodeling features in 2021. Don’t let your porch fall apart – it’s not a good look!

Repair Any Damages Quickly

Act fast to stop damage to your brick porch from getting worse. That’ll help you save money on repairs down the road. Here’s what to do:

  1. Find the damage.
  2. Scrub the area with a stiff brush. Take out any loose mortar.
  3. Mix a small batch of mortar. Put it on with a pointing trowel.
  4. Wait 24 hours. Brush off extra or smooth it out.

Look out for water building up and moss growing between bricks. They can cause damage you don’t see.

Include regular maintenance in your routine. Hire a pro to check for hidden issues.

Repairs shouldn’t be ignored. Check often, and take care of problems right away.

Follow these steps to keep your brick porch looking good for years. Refinish it every few years too — or let Mother Nature do it!

Refinish When Needed

Keep your brick porch fresh! Occasional finishing is essential to maintain its charm. Weather conditions can cause cracks and damage over time. Refinish the porch to stop further damage, restore its original shine, and add extra protection.

Assess the damage or aging. Spot any cracks, holes, or broken areas. Choose the right materials for filling gaps: mortar, caulk, or concrete. Sand down uneven portions before applying new finishes.

Reapply finishes every few years (depending on usage) to keep your porch in top condition. Don’t delay refinishing – otherwise costly repairs may be needed in the future! Maintaining your brick porch stops your guests from sitting on the ground.

Conclusion

A brick porch can be a great way to improve your home’s curb appeal. It has an attractive look and offers durability, low maintenance, and weather-resistant benefits. It can make your home stand out from the rest with its rich texture, colour, and quality.

Brick porches last for decades and need minimal upkeep. Unlike wooden decks, they don’t need to be stained or painted regularly. This can save you money in the long run.

Nick Hamilton, based in London, was trying to sell his old apartment. He needed a facelift. So, he installed a striking red-brick porch. His entrance door looked bold and beautiful. He got a better price than he expected!

This shows us that something as simple as adding a luxurious brick porch can have a big impact on our bank accounts when we sell our properties.

Frequently Asked Questions

1. What are the benefits of having a brick porch for my home’s curb appeal?

Brick porches not only enhance the aesthetic appeal of your home, but they also add value and durability. They require minimal maintenance and provide a sturdy surface for foot traffic. Overall, a brick porch is a great investment for any homeowner looking to improve their home’s curb appeal.

2. How does a brick porch compare to other materials like wood or concrete?

Brick porches offer more durability and longevity compared to wood or concrete alternatives. They are also less prone to cracking and require less maintenance over time. Plus, the timeless look of brick can add a unique and classic touch to your home’s exterior.

3. Can a brick porch be customized to fit my home’s design style?

Yes! Brick porches can be designed and customized to fit any home’s architectural style. Whether you have a modern or traditional home, a professional masonry team can create a brick porch that complements your home’s aesthetic while still providing the benefits of a brick porch.

4. How long does it take to install a brick porch?

The timeline for installing a brick porch can vary depending on the size and scope of the project. Generally, it can take a few weeks to a few months to complete. It’s important to work with a professional masonry team that can provide a timeline for your specific project and keep you informed throughout the process.

5. Are there any maintenance requirements for a brick porch?

Brick porches require minimal maintenance, but it’s important to keep them clean and free of any debris in order to prevent any damage to the surface. It’s also important to have a professional inspection done every few years to ensure the structure is still safe and secure.

6. Will a brick porch increase the value of my home?

Yes! A well-designed brick porch can significantly increase the curb appeal of your home, making it more attractive to potential buyers. Additionally, brick porches add value to your home due to their durability and longevity.

Retaining Wall Maintenance: Tips for Keeping Your Investment Looking New

Imagine watching your hard-earned investment crumble before your eyes – that’s what can happen when retaining walls are neglected. Just like your teeth need regular check-ups and cleaning, so does your retaining wall! Maintaining your retaining wall is a crucial task that every responsible homeowner should prioritize. Not only does it enhance your property’s curb appeal, but it also ensures the long-lasting durability of the wall.

But where do you start? How do you effectively keep your retaining wall in pristine condition? Fear not – we’ve got you covered. In this comprehensive guide, we’re going to share essential tips on retaining wall maintenance: from regular cleaning to conducting inspections for cracks and bulges to ensuring proper drainage systems are in place.

We’ll also look at some unique approaches, like planting vegetation around the base and adding decorative features like lighting, which can significantly contribute to your wall’s integrity.

Remember, neglecting your retaining wall can lead to costly and painstaking repairs in the long run. So let’s dive in and discover how to protect your investment effectively!

Importance of Retaining Wall Maintenance

Regular maintenance is key to keep your retaining wall looking like new. Neglecting upkeep leads to costly repairs or replacement. Attention should be given to structural stability, erosion control and aesthetic appeal. This will prolong the wall’s life.

Inspections biannually check for signs of cracking, leaning or bulging. This early detection helps avoid damage to property and surrounding areas. Applying sealant every other year protects the wall from weather wear-down.

Don’t forget drainage maintenance! Cleaning gutters and downspouts is crucial to prevent water damage and erosion. This ensures proper drainage at the foundation and increases its longevity.

Manufacturers’ recommendation for maintenance activities extends the life of retaining walls. With careful attention, these structures can last up to 50 years with minimal repairs. A small investment in ongoing care saves time and money on future repairs.

Maintaining your retaining wall may seem hard, but with these tips, your investment will stand for years!

Basic Maintenance Tips

To help maintain your retaining wall investment, basic maintenance tips with cleaning the retaining wall, inspecting for any damage, and fixing minor damage are essential. Regular cleaning can prevent buildup of debris, while inspecting for any damage can detect potential issues early on. For minor damage, timely fixes can prevent small issues from turning into costly repairs.

Cleaning the Retaining Wall

In order to keep your wall’s structural integrity, it is essential to keep it clean. Removing dirt and debris will prevent weather or other damage. Here is a four-step guide on how to clean the retaining wall:

  1. Get rid of any loose dirt or leaves from the surface.
  2. Use a pressure washer, adjusted for the material of the wall, to wash away dirt and stains.
  3. Mix water and detergent in a bucket. Scrub stubborn stains with a stiff-bristled brush.
  4. Rinse with clean water until all soap residue is gone. Let the wall dry before more maintenance.

Avoid harsh chemicals, opt for eco-friendly cleaners instead. If you find any cracks while cleaning, repair them immediately. Water can seep in and cause major issues. After cleaning, apply a sealant coat to keep the walls looking nice and protect them from further damage. With regular cleaning, you can keep your walls attractive and sound for years.

Inspecting for any Damage

Regular inspections of your assets keep you informed and help identify possible damages before they become expensive repairs. To guarantee your assets are in the best condition, here’s what to do:

  1. Begin with a thorough visual assessment of the asset. Look out for small scratches, dents, or rusting – they could be signs of damage.
  2. Check for any loose parts or bolts.
  3. See if there are any leaks in fluid lines, materials, or fuel tanks.
  4. Pay attention to electrical wiring and search for frayed or damaged lines.
  5. Lastly, check safety devices like lights, switches, and warning alarms.

Be sure to follow these steps carefully during routine inspections. Each asset is unique, though, so there may be specific areas that require more attention. Don’t let a minor problem turn into a huge one by ignoring the warning signs.

Conduct regular checks alongside preventative maintenance protocols to make sure you don’t miss anything major! After all, fixing a minor damage in life isn’t as easy as fixing a scratch on your car.

Fixing Minor Damage

Minor destruction can happen to anything, anytime. It’s critical to address it quickly. Fix minor damage with a professional approach to prevent it from getting worse. Here are some key steps for fixing minor damage:

  1. Find the Damage: Identify the damage and determine its severity.
  2. Clean the area: Clean and sanitise the damaged area with the right cleaning equipment.
  3. Check the severity: Analyse the damage and decide if it requires professional help or not.
  4. Start Repairs: If it’s moderate or minor damage, then start precautionary measures like applying adhesives/sealants or patching the defective zone.

Avoid DIY fixes for major damage that needs immediate professional help. Ignoring this crucial procedure can result in long-term repercussions for your health.

AAA research shows that US drivers spend $750 annually on car repairs and upkeep. Go advanced and show off your mechanical skills!

Advanced Maintenance Tips

To keep your retaining wall in excellent condition for years to come, follow the advanced maintenance tips provided in this section. Reinforcing the wall and waterproofing the wall are two crucial sub-sections that we will shortly explore to help you understand how to protect your valuable investment.

Reinforcing the Wall

  1. Inspect the wall for damages, cracks, and holes that need attention.
  2. Choose materials like brick, concrete, gypsum board, insulation foam, or other reinforcements based on the project’s requirements.
  3. Clean and clear the work area, then layer the wall until desired strength is achieved.
  4. Give the work a finishing touch with paint or plaster.
  5. Conduct routine maintenance checks after reinforcing to catch potential issues.
  6. For longevity, use only high-quality reinforced materials approved by professionals.
  7. Don’t wait any longer – reinforce your walls! Make them waterproof if you don’t want your house to become a waterpark.

Waterproofing the Wall

Waterproofing your wall is key for its longevity and to prevent moisture damage. Here’s how you can do it:

  1. Inspect for Problem Areas: Check for cracks, gaps, and damp patches.
  2. Prepare the Surface: Clean and remove any paint, dirt or debris.
  3. Apply Waterproof Coating: Use a material that protects against water damage. Brush on two to three coats.

Avoid ordinary paint or incompatible materials. Invest in high-quality waterproofing materials, even if it costs more – prevention is better than cure!

Plus, save yourself the time and trouble of building a retaining wall – leave it to the professionals and use your time for more important pursuits – like perfecting your dark humour!

Professional Retaining Wall Maintenance Services

As a homeowner, you want to keep your retaining wall looking nice. Professional masonry services can help. They can identify drainage issues and damage to the structure. Plus, they can clean and seal the wall.

Inspections are also available. By doing scheduled inspections, you can find potential problems before they get too bad.

Pro Tip: Hire a pro to maintain your retaining wall at least once a year. It’ll save you time and money in the long run. Like sanity, proper maintenance of your wall is key!

Dos and Don’ts of Retaining Wall Maintenance

Retaining Wall Maintenance: Best Practices

Maintaining walls can be overwhelming. But it’s essential to keep your investment looking new. Here are the best practices for wall maintenance.

Dos:

  1. Inspect the wall regularly and look for any signs of damage.
  2. Clear out debris from behind the wall.
  3. Use a power washer with mild detergent to clean dirt buildup.
  4. Repair any cracks or gaps ASAP.
  5. Apply a sealant to protect from water damage and UV rays.
  6. Hire a professional mason for larger repairs.

Don’ts:

  • Use harsh chemicals or pressure washers with high setting.
  • Use sharp tools or equipment that could puncture holes.
  • Paint the retaining wall.

It’s important to know the type of material your wall is made of. Different materials have different maintenance needs. For example, timber walls need to be treated annually. Concrete walls require more frequent inspections for cracks.

My client had a collapsed wall due to neglected inspections. He had attempted DIY repairs without consulting professionals, which led to permanent damages. Large repairs should always be done with an expert opinion.

Retaining wall maintenance can be easy with these tips. Protect your investment!

Conclusion

Retaining Wall Care: Keep it Simple!

Make sure your retaining wall has proper drainage. Don’t put heavy items on or near it. Fix any cracks or damage quickly.

Do these things to protect your investment.

Pro Tip: Get a professional mason to inspect and repair your wall. That way, it’ll look and work great!

Frequently Asked Questions

Q: How often should I maintain my retaining wall?
A: It is recommended to inspect your retaining wall annually. Minor maintenance can be done every two years, while major repairs should be done every five years.

Q: How do I clean my retaining wall?
A: Use a pressure washer on a low setting to remove dirt and grime from the surface. For tough stains, mix water and bleach and apply it to the surface with a soft-bristled brush.

Q: What should I do if my retaining wall is leaning?
A: Leaning retaining walls can be hazardous. It is best to contact a professional masonry contractor to assess the situation and provide the appropriate repairs.

Q: Can I paint my retaining wall?
A: Yes, you can paint your retaining wall. However, it is important to use paint that is specifically designed for masonry surfaces. Be sure to clean the surface thoroughly before painting.

Q: How do I prevent water damage to my retaining wall?
A: Proper drainage is key to preventing water damage. Ensure that your retaining wall has proper drainage systems installed, and check them regularly.

Q: How do I know when it is time to replace my retaining wall?
A: If your retaining wall has extensive damage, is severely leaning, or is over 20 years old, it may be time to consider replacement. It is important to contact a professional masonry contractor to assess the situation.

DIY Retaining Wall Construction and Repair: Tips and Techniques for a Professional Finish

DIY Retaining Wall Construction

To build a successful DIY retaining wall, planning and preparation are key. In order to achieve a professional finish, start with planning and designing the retaining wall. To take on this DIY project, gather the right tools and materials needed for the construction. You should also focus on building the footing of the retaining wall, laying the bricks or blocks properly, and filling with gravel and soil to secure the retaining wall.

Planning and Designing the Retaining Wall

Constructing a retaining wall? Meticulous planning and designing is essential! Here’s a 4-Step Guide to ensure success:

  1. Consider the Purpose. Why do you need the wall and how does it fit your outdoor space?
  2. Choose Location and Materials. Think about slope, soil type, moisture and weather.
  3. Measurements and Drainage System. Get the right height, width and thickness. Plan any drainage systems needed.
  4. Safety Considerations. Check local building codes or hire professionals.

There are other details too. Consider cost-effectiveness, local laws and permits. Maximize your outdoor space with a beautiful wall. Plan beforehand to avoid costs later! Oh, and don’t forget your shovel!

Tools and Materials Needed for the DIY Retaining Wall Construction

Gather your tools and materials for a successful DIY wall construction. Necessities include: bricks, block stones, cement, drainage pipe, gravel, shovel, spirit level, and a rubber mallet. Make sure you have everything before starting.

Align your bricks or blocks correctly. Dig deep holes and insert drainage pipes. Cover the base with gravel before adding the concrete foundation.

You’re building a BFF! Burnt clay ‘bricks’ were used in ancient Persia to build fortifications. Today, we use modern materials like cement and block stones. Take advantage of the lessons learned centuries ago. Get ready for your DIY retaining wall!

Building the Footing of the Retaining Wall

A strong retaining wall needs a solid footing. ‘Foundation Building’ sets the base for the entire structure and keeps it strong. Here’s a guide to make the footing for your wall:

  1. Mark the corners of the wall and run a string line between them.
  2. Dig along the string line with a shovel or machine, depending on the size.
  3. Add gravel, level it up.
  4. Compress the gravel with a soil compactor, making sure it’s even.
  5. Pour around 6 inches of concrete into the trench, with building stakes to keep it at the same height. Add in some reinforcing bar mesh to strengthen.
  6. Use a float trowel to smooth the concrete, letting it cure before building up.

Be sure to take accurate measurements of the corner points. Make sure the excavation is spread out evenly before pouring in the concrete. Remove dirt from the site for fast construction.

Build your wall with love and care. Ensure water is added to cement. Create a space of lasting memories. If you want your wall to last, lay those bricks just right – or face the shame of your neighborhood!

Laying the Bricks or Blocks Properly

Make sure your DIY retaining wall is strong and lasting. Here’s how to do it:

  1. Clean the area before you lay the bricks or blocks. No debris, soil, or rocks allowed.
  2. Level the ground and add gravel or sand in layers at least 4 inches thick. Compact each layer.
  3. Use mortar between the bricks or blocks. Place each brick or block level and aligned. Put a thin layer of mortar on the base.
  4. As you work up, apply more mortar between layers. Use a trowel to smooth it out and add stability.
  5. Install metal reinforcing rods into some of the rows to improve durability without losing aesthetic appeal.

Retaining walls were used for agricultural purposes 500 BC! Get your hands dirty and fill that wall with gravel and soil.

Filling with Gravel and Soil to Secure the Retaining Wall

To reinforce your retaining wall’s structural integrity, a combination of gravel and soil is essential. This technique resists pressure from the earth surrounding it. To fill the wall with gravel and soil, follow these six simple steps:

  1. Place a layer of crushed stone or pea gravel in the trench.
  2. Compact the layer using a plate compactor or hand tamper.
  3. Add another 4-inch layer of crushed stone or pea gravel.
  4. Compact this second layer.
  5. Fill in any gaps behind the wall with soil.
  6. Compact the soil against and behind the wall.

Remember to frequently check for any gaps between the backfill and retaining structure along its length. Leave 6 inches between adjacent walls and use gravel beneath for water drainage. Single-wythe does not provide enough weight resistance.

James reported success with his DIY retaining project via Youtube tutorials. He experienced minimal complications while filling his walls with gravel and soil. Retaining walls require TLC to prevent your backyard from becoming a landslide!

Retaining Wall Repair

To repair your retaining wall, you need to identify the problem or damage first. The right repair technique is crucial to avoid any further damage. Repair cracks on the retaining wall using proper tools. Reinforcing the retaining wall with proper drainage prevents future damages. In order to prevent any future damage, you need to follow certain techniques.

Identifying the Problem or Damage on the Retaining Wall

To keep your retaining wall strong and stable, regular inspections are a must. Check the wall’s surface for stains, bulges, or cracks. Also look at the surrounding area for soil erosion, water buildup, and shifting soil. Spot any patterns or inconsistencies that may indicate trouble.

Be alert for signs of leaning and movement, as these could mean an upcoming failure. It’s important to address damage or issues quickly, because neglecting repairs increases safety risks and can cause larger structural problems.

Remember, when it comes to fixing your retaining wall, choose the right technique that’s reliable and won’t cause future headaches.

Choosing the Right Repair Technique

Choosing the Perfect Way to Fix Retaining Walls

Retaining walls are important structures that keep soil in place and make landscapes look better. However, they can be damaged due to age, weather, and bad construction. To repair them, there are a few options. Consider the following when picking the right method:

  • Check the intensity of the damage – Figure out how serious it is. This will tell you if a minor repair or a big change is necessary.
  • Wall material – Different materials such as concrete, stone, and wood need different methods. Think of the material before deciding.
  • Budget – Decide how much you can spend on repairs. This will affect your choices.
  • Expert advice – Consult a specialist who can give the best solution based on their experience.

Do repairs quickly when damage happens. Not doing so can cause more damage and cost more.

For each situation, there are special details to think of when choosing the right technique. Knowing these details will help you choose between typical replacement or modern advancements from the newest technology.

Don’t take chances with retaining wall repairs as they are important and must work correctly all the time without any risks.

Don’t wait too long; once you spot any cracks or damages, pick the right repair method right away. Take action now to prevent situations that could have been prevented with early restoration. When it comes to fixing cracks in a retaining wall, don’t forget: it’s like putting a band-aid on a broken bone.

Repairing Cracks on the Retaining Wall

Retaining walls are amazing garden features, stopping soil erosion and providing level land for gardening. But, small cracks can be caused by poor construction, moisture, and sudden weather changes. So, repairing these small damages is essential to keep the wall looking good and structurally sound. Here’s 4 steps to repair small damages:

  1. Clean dirt and debris with a wire brush or power washer.
  2. Use a putty knife to fill the damaged area with concrete patching compound. Layer it on thin, and let each layer dry before adding the next.
  3. Mix bonding adhesive with water, as instructed by the manufacturer. Brush this onto the clean surface, let it dry, then put on the patching compound.
  4. Let the repair cure for 24 hours before painting or sealing.

For more serious problems, it may be better to get professional help or replace the wall. Ancient civilizations used retaining walls to level sloping land, create terraces, and decorate gardens. The Romans were known for their stone blocks supported by soil. Nowadays, retaining walls use steel bars, spray mixes, and poured concrete. Don’t forget the drainage! A wall without proper drainage is like a sinking ship.

Reinforcing the Retaining Wall with Proper Drainage

To strengthen retaining walls, proper drainage is key. Too much water can cause cracks and bulges. Here are five steps to reinforce with proper drainage:

  1. Dig the soil behind, adjacent to, and at the base of the wall.
  2. Put in a perforated pipe at the bottom of the excavation area.
  3. Cover it with gravel and a geotextile fabric.
  4. Put back the excavated soil, compacted in layers against the wall’s surface.
  5. Make sure water is directed away from the re-graded area.

Gravity-based, non-perforated pipes or drain tiles might also help. Professional help is recommended for these jobs.

It all began in the early 1900s when floods in cities like Los Angeles led to costly repairs. Engineers tried different techniques, like building retaining walls supported by steel beams, and drainage systems with perforated pipes and geotextile fabrics. To avoid another repair bill, remember to maintain your wall. Unlike my ex who didn’t even text me!

Preventing Future Damages on the Retaining Wall

Inspect and repair retaining walls consistently to prevent future damage. Proper drainage and vegetation control can help maintain structural stability. Utilize high-quality construction materials and soil reinforcement methods to minimize future damage. Hire a professional contractor to ensure optimal results.

Be aware that weather conditions and natural disasters may still cause damages even with the right maintenance. Address any repairs promptly after such events to avoid further damage.

Historically, inadequate maintenance and poor workmanship have caused significant damage to many retaining walls. In some cases, this has led to entire structures catastrophically failing due to their own weight and influences. Today, proper preservation techniques contribute significantly to avoiding similar scenarios in the future. Pursue a flawless finish on your retaining wall repair – do not leave any stone unturned!

Tips and Techniques for a Professional Finish

To achieve a professional finish for your DIY retaining wall construction or repair, you need some tips and techniques that can make this task a success. With this in mind, we will discuss some sub-sections that can help you in achieving the desired outcome. We’ll explore how cleaning and finishing the retaining wall can enhance its appearance, adding decorative features to make it more attractive, and proper maintenance to ensure its longevity.

Cleaning and Finishing the Retaining Wall

The Retaining Wall Care Guide: Tips and Techniques for a Professional Finish!

A tidy, well-maintained retaining wall boosts the look and strength of your property. Achieve a professional finish by performing the right cleaning and finishing processes for your retaining wall.

  1. Step 1 – Cleaning: Start by removing any debris, such as leaves, moss, or dirt. Utilize mild soaps or cleaners to take away any stains or encrustations. Next, use a pressure washer to thoroughly wash the wall with water and take away any loose material. Be careful not to apply too much pressure that could damage the surface.
  2. Step 2 – Sealing: After cleaning, give it plenty of time to dry before sealing. Applying a sealant is essential for preserving the overall appearance of your retaining wall. Sealing prevents moisture from entering into the walls, adding an extra layer of protection against deterioration due to elements like frost/heating cycles.
  3. Step 3 – Finishing: Select a finishing that blends with your property’s theme or introduces an exciting contrast. You can go for paint that coordinates with specific outdoor features like patios or decks. Furthermore, using decorative stones offers texture and visual appeal while giving weather-resistant advantages.

Keep in mind, lack of proper maintenance can lead to cracking and crumbling over time, making it necessary that you stay mindful of cleaning and upkeep. Doing minor repairs now will save you huge costs later!

Incorporate these tips into your regular retaining wall care schedule to guarantee longevity and an incredible finish over time! Why be content with a plain old retaining wall when you can add some decorative flair and give your neighbors something to talk about?

Adding Decorative Features to the Retaining Wall

To spruce up the retaining wall, get creative! Here are 6 helpful tips:

  • Put planting pockets or niches between and within the blocks.
  • Add texture and contrast with brick veneers or stone facades.
  • Light up key features at night with lighting fixtures.
  • Create a calming effect with water features like fountains.
  • Add an electrifying element with artistic engravings or mosaics.
  • Surround the wall with vibrant trellis panels and multi-coloured plants.

Pro Tip: Plan ahead, factor in placement, budget and materials for best results. Treat it with care – a well-maintained wall can last longer than a marriage!

Don’t add extra weight on the retaining wall. Choose decorative pieces with patterns, shapes and colours.

Proper Maintenance of the Retaining Wall to Ensure Longevity

Prolong your retaining wall’s life! Maintaining it properly is essential. Clean it, inspect for damage, and address any repairs. Plus, ensure proper drainage to avoid water damage and erosion.

Neglecting maintenance can lead to costly repairs or reconstruction. So take time to handle upkeep – save money and headaches!

High-quality materials and professional installation also extend the wall’s lifespan. Choose durable options from reputable vendors.

Pay attention to climate patterns in your area too. More frequent maintenance may be needed in areas with heavy rainfall or harsh winters.

I once saw a neglected wall crumble during a storm, a reminder of how vital regular maintenance is. Don’t let this happen to you – take care of your investment!

Frequently Asked Questions

1. What materials do I need to build a DIY retaining wall?

To build a DIY retaining wall, you will need retaining wall blocks or stone, gravel, sand, and landscape fabric. You will also need tools like a shovel, a level, a rubber mallet, and a hand tamper.

2. Do I need a permit to build a retaining wall?

In most cases, you will not need a permit if your retaining wall is less than 4 feet tall. However, it’s always best to check with your local building department to see if there are any specific requirements or regulations for your area.

3. How do I repair a retaining wall?

If your retaining wall is leaning, cracked, or bulging, you may need to repair it. Start by removing any damaged blocks or stones, and then use construction adhesive to attach new ones in their place. You may also need to add drainage behind the wall to prevent future damage.

4. How do I ensure my retaining wall is level?

To ensure your retaining wall is level, start by digging a level base and filling it with gravel and sand. Then, use a level to ensure that each block or stone is even with the ones next to it. A rubber mallet can help you adjust the height of each block.

5. How do I prevent erosion behind my retaining wall?

To prevent erosion behind your retaining wall, place landscape fabric against the soil and behind the wall, and then cover it with a layer of gravel. This will help filter water away from the wall and prevent soil from washing away.

6. Can I build a DIY retaining wall without professional help?

Yes, you can build a DIY retaining wall without professional help if you have the necessary tools and materials and follow proper instructions. However, if you have any doubts or concerns, it’s always best to consult with a professional mason or engineer.

This image depicts a lush, overgrown garden wall. The brick wall is covered in a variety of climbing vines and flowers, including white blossoms and vibrant pink flowers. The greenery cascades down the wall, creating a beautiful, natural aesthetic. The surrounding foliage, including trees and other plants, adds to the serene, garden-like atmosphere. The overall impression is one of a charming, well-tended outdoor space.

Different Types Of Retaining Walls And When To Use Them

Introduction to Retaining Walls

Retaining Walls – An Overview

Retaining walls are used in landscaping and construction projects. They keep soil in place and prevent erosion. Plus, they add depth and beauty to outdoor spaces.

Types of Retaining Walls

Gravity walls, cantilevered walls, sheet pile walls, and anchored walls are all types of retaining walls. Gravity walls use their weight. Cantilevered walls rely on the weight of the wall and foundation. Sheet pile walls use interlocking steel sheets driven into the ground. Anchored walls have cables or other tiebacks attached to the structure.

When to Use Them?

The type of retaining wall you need depends on your landscaping requirements, budget, and aesthetics. Gravity walls are inexpensive but only suitable for low heights. Anchor walls are more expensive but better for taller requirements.

Interesting Historical Fact

The Romans used gravity retaining walls with stacked stones held together by mortar. This helped them build on sloping terrain. Today’s designs have customised textures, colours, and shapes that make modern landscapes unique. Gravity walls keep their ground!

Gravity Retaining Walls

To learn about gravity retaining walls and their usage in masonry, read on. Here are the advantages and disadvantages of using gravity retaining walls along with the specific situations when this type of retaining wall becomes necessary.

Advantages of Gravity Retaining Walls

Gravity Retaining Walls are structures used to keep soil in a vertical position. Their benefits make them a preferred choice. They have structural stability, are cost-effective, easy to build, and can provide an aesthetically pleasing look.

Unique features of Gravity Retaining Walls include durability, resistance to erosion, and flexibility in design. Ancient civilizations used them for floor reclamation from water bodies. France introduced modern designs in the 1800s, and American designers popularized them.

But, beware! These walls can come down quickly in a windstorm. Avoid them if you want your property to stay in place.

Disadvantages of Gravity Retaining Walls

Gravity Retaining Walls: When you want to hold back the earth without breaking the bank. But beware – there’re drawbacks and limitations! Here’s a few:

  • Height is limited to 15 m, so this won’t work for higher walls.
  • Expertise and special machinery adds to the cost.
  • Gravity walls take up a lot of space for stability.
  • No decorative surfaces with plain concrete or unadorned stones.

Also, architectural restrictions may be an issue. If you have lots of manpower, you may need to use an excavator. We once transported one miles away for a backyard project!

When to Use Gravity Retaining Walls

Gravity retaining walls can be a great choice for soil stability. They rely on their weight alone, not needing anchoring or reinforcement. This makes them special in many cases.

  • When cost and efficiency are needed, gravity walls are the answer.
  • If aesthetics matter, these walls can offer variety of designs and materials.
  • In tight spaces or with limited access, they can be built without extensive excavation.
  • When construction speed is needed, these walls can go up quickly.

Sometimes, existing walls need to be replaced. In these cases, gravity walls can be dismantled and reused in reinforced structures or new retaining systems.

Pro Tip: Have qualified professionals check the design of your gravity wall. Without proper design, foundation settlement from the added weight of the wall may cause structural damage.

Cantilever retaining walls are an alternative to foundations – hang your wall off a cliff!

Cantilever Retaining Walls

To build a strong and reliable retaining wall, Cantilever Retaining Walls can be an excellent solution. The Cantilever Retaining Wall method offers a variety of advantages and disadvantages that you should know before constructing your wall. In this section, we’ll explore each of these benefits and drawbacks in detail and discuss when exactly you should use this method based on your requirements.

Advantages of Cantilever Retaining Walls

Cantilever Retaining Walls are an excellent option for retaining soil. They have many benefits that make them an ideal choice for many construction projects.

  • For instance, they are cost-effective as they require less material than other walls. Plus, they are incredibly stable, capable of handling heavy loads and high stresses.
  • Maintenance is also minimal due to their strength and durability.
  • These walls can be used on various types of terrain, like steep hillsides or even water sources.
  • They are also quite sustainable, as the materials used can be recycled and reused multiple times.

One example is the Ancient Walls of Petra, Jordan. Built thousands of years ago, they are still standing today due to their strength and durability over time.

Building a cantilever retaining wall may take more effort, but it’s worth it – you won’t have to worry about landslides ruining your party.

Disadvantages of Cantilever Retaining Walls

Cantilever Retaining Walls – 5 Drawbacks

Cantilever retaining walls are popular for their stability, but have some limitations. Here are five things to consider:

  • Construction Costs: More materials are needed for cantilever walls, increasing costs.
  • Maintenance: They can be hard to repair or maintain.
  • Soil Movements: Shifting soil can cause instability and collapse.
  • Design Limitations: There are restrictions on height, width, and reinforcement.
  • Drainage: Proper drainage is essential or water damage may occur.

Remember these factors when designing such a structure. Ancient civilizations, like the Babylonians, used similar methods. If soil is on the move, try a cantilever wall!

When to Use Cantilever Retaining Walls

Cantilever retaining walls are the preferred choice for earth retention systems. They use reinforcement and a horizontal base slab to maintain soil stability.

This type of wall can go up to 25 feet, depending on soil characteristics. Plus, it uses less concrete and requires less excavation than other wall types. However, special care must be taken to ensure structural integrity.

Did you know that cantilever retaining walls were first introduced by French engineer Henri Vidal in the early 1950s? A sheet pile retaining wall is like upgrading from a cardboard box to a bunker.

Sheet Pile Retaining Walls

To gain an understanding of sheet pile retaining walls, turn to this section in the article ‘Different Types of Retaining Walls and When to Use Them’. Discover the advantages and disadvantages of this type of retaining wall and learn when it is the appropriate choice for your project without any confusion.

Advantages of Sheet Pile Retaining Walls

Sheet pile retention walls offer a reliable and efficient solution for retaining materials in tight spaces. Interlocking steel sheets are placed vertically in the ground and help keep soil stable and prevent erosion.

  • They require less labor to install than other types of walls.
  • Their small footprint makes them perfect for limited space projects.
  • They can be used in both water-filled and dry environments.

Another great feature of these walls is that they can fit into narrow areas where other structures won’t fit. Plus, they can be made from various materials, such as steel or vinyl.

The benefits of sheet pile retention walls are clear: reduced maintenance, improved stability, and less environmental impact. So don’t miss out; consider them for your next project! And if nothing else, they won’t judge you for leaning on them after a long day.

Disadvantages of Sheet Pile Retaining Walls

Sheet Pile Retaining Wall Hazards – Sheet pile retaining walls have become popular in construction. But, there are potential risks!

  • Specialized equipment and expertise is needed for installation.
  • Noise levels during construction may disturb those nearby.
  • The cost of sheet pile walls can be higher than other wall types.
  • They may not be suitable for sites with lots of groundwater.
  • Inadequate design or installation can lead to structural problems.
  • Maintenance is needed to prevent corrosion and extend its life.

Evaluating the site is key for safety and stability. But, tragedy can happen. A below-grade parking garage was excavated with sheet pile walls. An accident occurred when part of the sheet piling gave way, injuring workers. The investigation revealed soil conditions were different from what was predicted. This should have been taken into account before construction. So, when it comes to sheet pile walls – watch out for soil that’s ready to slide!

When to Use Sheet Pile Retaining Walls

Sheet pile retaining walls are ideal for stabilizing soils in irregular geological conditions. They’re cost-effective and durable, perfect for soft soils, deep excavations, and waterfront areas. Plus, minimal excavation is required for installation, making them eco-friendly.

They can be used for various purposes such as flood protection, earth retention, and basement construction. Design depends on factors like water table level, soil type, and slope angle.

The National Association of Steel Pipe Distributors (NASPD) confirms that sheet piles are typically used in static sheetpile walls. So, anchor away! These walls are reliable and won’t move.

Anchored Retaining Walls

To understand anchored retaining walls better, with its advantages, disadvantages, and when to use, consider these sub-sections as solutions for your masonry concerns. Anchoring walls is particularly advantageous when you need to hold back tons of soil. However, it also carries disadvantages that you should take into account when considering this type of retaining wall. Knowing when to use anchored retaining walls is also vital for its success.

Advantages of Anchored Retaining Walls

Anchored Retaining Walls are a boon in civil engineering. They are fixed into soil and reinforced with cables or rods to make them sturdier. This is an alternative to the traditional gravity-based approach that prevents soil erosion.

The pros:

  • They are stronger than other walls.
  • They can be constructed in tight places.
  • Installation is quick and inexpensive.
  • These walls work well on steep gradients where conventional walls fail.
  • They are flexible and can withstand seismic activity.

Something to keep in mind: Anchored walls may sway during harsh conditions, but the anchors stay intact. An annual inspection is advised to check stability.

Pro-Tip: These walls are great for roadways, bridge abutments and even building foundations as they are cost-effective. Anchored walls may have some cons but they won’t cost you an arm and a leg to repair.

Disadvantages of Anchored Retaining Walls

Anchored retaining walls have flaws. These structures have shortcomings that affect their performance.

Some of these drawbacks include:

  • Expensive to make due to extra materials and labor.
  • Complicated engineering for designs.
  • Safety hazards if not installed or maintained properly.
  • Damage to nearby objects or utilities if deep anchors are needed.

Maybe anchored retaining walls aren’t the best option for a project. Each should be considered separately.

To reduce risks, designs must be planned and done by qualified professionals. Inspections and maintenance can help spot problems. Taking these steps can minimize risks and ensure successful construction with anchored retaining walls.

When to Use Anchored Retaining Walls

Anchored retaining walls are the go-to choice when extra soil reinforcement is needed. They work in high water tables, soft soil, and areas with difficult access. These walls are awesome when traditional gravity walls don’t provide enough support.

Anchored retaining walls are perfect for structures with heavy loads or tight spaces. Highways, railways, and other infrastructures can benefit from them. Unlike gravity walls, anchored retaining walls use anchors that go deep into the ground. These anchors add an external force to hold back the earth’s weight.

Anchored retaining walls have an extra advantage – they can handle seismic activity! Their flexibility lets them move with soil during an earthquake without losing their strength.

When you need a retaining wall, don’t hesitate to choose an anchored one. They are reliable and can stand up to different soil conditions and earthquakes. Invest in anchored retaining walls for your project’s long-term success and safety!

Hybrid Retaining Walls

To optimize the functionality and aesthetics of your retaining wall, consider using hybrid retaining walls. They combine the best features of different types of retaining walls, and can provide several advantages as a result. However, there are also potential downsides to using hybrid retaining walls that you should be aware of. In order to make the most informed decision, it is important to know when to use hybrid retaining walls in your particular landscaping project.

Advantages of Hybrid Retaining Walls

Hybrid Retaining Walls – A Blessing for Engineers!

Hybrid retaining walls are a must-have for engineers. Here are some of their awesome benefits:

  • Cheaper than traditional retaining walls
  • More strength and stability
  • Eco-friendly construction materials
  • Flexible design and construction
  • Reduced build time with precast systems

Know this too – Hybrid retaining walls have a reduced carbon footprint! They use fewer resources and make less waste.

Super cool fact – The International Journal of Sustainable Built Environment reports that hybrid retaining walls reduce carbon emissions by up to 50%, compared to other construction methods.

Hybrid Retaining Walls: a mix of power and fragility, just like your ex!

Disadvantages of Hybrid Retaining Walls

Hybrid Retaining Walls – Pitfalls and Risks

Hybrid retaining walls are a creative solution for slope stability issues, however, they can also come with their own set of troubles. These problems often come from combining distinct wall types in order to fit the particular site conditions.

Here are six key risks and pitfalls that may come with hybrid retaining walls:

  • Complicated Design and Construction Process
  • Higher Cost due to Uniqueness of Solution
  • Durability may be Compromised in harsh weather
  • Maintenance can be expensive in the long run
  • Engineers may not have expertise in Hybrid Wall designs
  • The Potential to Worsen Drainage Issues if not installed properly

It’s important to note that the complexity of the design process can cause delays in construction and reduce overall safety levels. This can lead to higher costs than what was planned.

Additionally, some of the distinct features may result in high hauling costs during construction due to various materials, bulky equipment, and hard-to-reach areas.

Still, despite all these challenges, Hybrid walls remain an effective solution for addressing slope failure issues when traditional designs are not enough.

It’s noteworthy that the roots of hybrid retaining wall technology can be traced back to piled foundation techniques from Ancient Greece and Rome. Pioneering engineers and builders used a method known as piling behind their regular gravitationally stabilized walls which worked well then too!

Hybrid retaining walls: You can’t choose between a rock and a hard place? Get both!

When to Use Hybrid Retaining Walls

When thinking of hybrid retaining walls, important factors to consider are site topography, soil, and water conditions. Combining different materials and designs can provide greater stability and a better look.

The table below explains when hybrid retaining walls are suitable:

Scenario Reason
Sloped terrain Hybrid walls combat soil erosion and water drainage.
High-load applications Reinforced concrete or steel panels in a hybrid wall can handle heavier loads.
Aesthetics Hybrid walls offer versatility in design & materials to fit surroundings.

Sometimes, a combination of different wall types is needed for one project.

Thanks to modern technology, experimenting with materials led to the development of hybrid retaining walls. This has helped many industries such as construction, civil engineering, and infrastructure.

Choosing the right retaining wall is like finding a good spouse – it’s all about finding the perfect match that will last.

Key Factors to Consider While Selecting a Retaining Wall

To choose the right retaining wall for your property, you need to consider site conditions, aesthetic value, cost, and maintenance. In this section, we’ll guide you on how to weigh these factors with the title ‘Key Factors to Consider While Selecting a Retaining Wall’. You’ll get an understanding of how each sub-section plays into choosing the right type of retaining wall for your needs.

Site Conditions

For the structural integrity of your retention wall, it is essential to conduct a comprehensive assessment of the site parameters. The selection of the retaining wall depends on various factors related to its location and conditions.

To ensure suitability, one must consider resistive forces, angle of wall inclination, land contouring requirements, soil type, drainage, and seismic forces. Refer to Table 1 for site condition considerations. Additionally, walls on hills must account for variations in soil characteristics. Areas with seismic activity require specialty walls designed with these forces in mind.

In one project, precipitation caused excess rainwater runoff on a hillside made up of expansive soils. Traditional retaining walls were not feasible, so we used block work reinforced with earthy cast-on-site cement grout coat and coating reinforcement coils. This provided uniform resistance and stability against lateral loads.

Retaining walls can be aesthetically pleasing too! Build one so beautiful your guests won’t even remember it’s holding up a small mountain.

Aesthetic Value

When selecting a retaining wall for your property, the visual appeal is key. Pick a design that suits your taste and preferences and consider the color, pattern, and texture of the wall in relation to the surrounding elements like plants, rocks, and structures. This could add interest and depth to a flat landscape.

Furthermore, an attractive retaining wall can be a focal point in your landscaping design, making it stand out amongst the neighbors. It can also enhance the overall curb appeal of your property, boosting its beauty and value.

So don’t forget to factor in the aesthetic value when selecting a retaining wall. Make a wise decision and your landscaping design will reach new heights! Just remember, building a retaining wall can be pricey, so hold onto your wallet!

Cost

It’s essential to think about the money you’ll spend when selecting a retaining wall. The cost may differ depending on size, type of materials, and labor.

Moreover, ongoing maintenance costs should be contemplated. For instance, untreated wood might need to be fixed or replaced often.

To save cash without sacrificing quality, think about using recycled materials or getting a modular design that can be quickly installed with no deep excavation.

As per Consumer Reports, homeowners who got higher-quality retaining walls got an average return of 80%. Parenting a retaining wall is similar – it necessitates constant attention and plenty of endurance.

Maintenance

Regular inspections must be done yearly to maintain the integrity of your retaining wall. Check for cracks, bulges, or tilting, which could mean it’s failing.

Ensure drainage systems work well and clear obstructions from water outlets. Stagnant water can cause damage. Remove debris like leaves, sticks, and dirt from the base.

For aesthetics, give it a fresh coat of paint and it’ll provide a protective layer. Address any flaws immediately before they worsen.

When selecting a type of retaining wall, follow installation procedures carefully. Get experts to install it and follow their instructions.

For maintenance, seek professional help. This will ensure better outcomes and prolonged structure longevity.

Conclusion: Choosing the Right Retaining Wall

Analyze the various types of retaining walls and their uses to make an informed decision. Factors such as cost, material, size, location and height must be considered. Refer to the Table below; it outlines the four main types of retaining walls – Gravity Walls, Cantilevered Walls, Sheet Piling and Anchored Walls. It also explains their benefits, downsides, and suitable applications according to situations.

Type of Retaining Wall Benefits Downsides Suitable Applications
Gravity Walls Affordability and easy installation Limited height capacity Suitable for low-lying areas with gradual slopes
Cantilevered Walls Can support taller heights than Gravity Walls Requires extra reinforcement and expertise for stability Suitable for medium to high slopes in limited spaces
Sheet Piling Ideal for tight spaces Limited soil stabilization capability Suitable for areas with water, like marshlands or beaches
Anchored Walls Supports significant loads and higher heights than other wall types Expensive due to steel cables used Suitable for high slopes or locations with heavy loads

Remember geological stability, drainage capabilities, soil condition and environmental regulations when choosing a retaining wall. Some regions may require permits before building a retaining wall. Check with your local authorities.

Did you know? The Great Wall of China was made for military defense against invaders over two thousand years ago and is still standing today, although its purpose is no longer necessary.

Frequently Asked Questions

Q: What are the different types of retaining walls?

A: There are several types of retaining walls, including gravity walls, cantilever walls, anchored walls, sheet pile walls, and gabion walls.

Q: What is a gravity retaining wall?

A: A gravity retaining wall relies on its mass to hold back soil and can be constructed using materials like stone, concrete blocks, or timber.

Q: When should I use a cantilever retaining wall?

A: A cantilever retaining wall is useful where a significant load is present, and there is limited space for the installation of a gravity retaining wall. It is typically more suitable for larger retaining walls.

Q: What is an anchored retaining wall?

A: An anchored retaining wall uses cables or rods that are anchored in the soil to hold back the earth, making it a suitable option for retaining walls with high loads or those in unstable soils.

Q: When should I use a sheet pile retaining wall?

A: Sheet pile retaining walls are ideal for areas with soft soil where you need to retain a small amount of earth. They can be used as temporary or permanent solutions depending on the need.

Q: What is a gabion retaining wall?

A: A gabion retaining wall is made of steel mesh wire baskets filled with rocks, concrete, or other materials. They are an eco-friendly and cost-effective option for retaining walls of various heights.

This image depicts a large, two-story residential home with a distinctive architectural style. The home features a combination of stucco and stone exterior walls, with a prominent gabled roof design that includes multiple peaks and overhanging eaves. The roof is made of a warm-toned material, likely wood or asphalt shingles. The home has several large windows and a covered entryway with a stone porch. In the foreground, there is a person standing on the sidewalk, providing a sense of scale and context for the home. The surrounding landscape includes some trees and greenery, suggesting a suburban or rural setting.

Stone Skirting vs. Other Types of Foundation Coverings: Which is Right for You?

Introduction

Seeking the best foundation covering can be hard. Homeowners need something tough, long-lasting and attractive. It’s important to compare Stone Skirting to other types of covering. Stone Skirting adds value to the exterior of a house and comes in various styles, such as veneer stone or natural stone. It’s also resistant to rot, fire, weather and requires little maintenance. It can last forever!

Vinyl or metal skirting don’t have the same charm as Stone Skirting. Installation is a one-time job, which means long-term savings. Plus, it offers insulation from changing temperatures. This helps keep heating costs down.

Masonry experts at BrickDoctor.com say this – “Stone veneer siding is one of the most requested services. It gives homes a unique look that provides protection and adds value.”

If you want to make your foundation look great, then Stone Skirting could be the perfect choice.

Stone Skirting: Definition and Features

Stone Skirting: Explanation and Notable Attributes

Stone skirting is a masonry construction that hides the open space beneath a house’s floorboards. It’s an elegant alternative to traditional siding with practical benefits. Here are six points to consider about Stone Skirting:

  1. Strength and Durability – Durable materials require no maintenance. It stands up against harsh weather and has a long life.
  2. Thermal Efficiency – High heat retention capacity of stone materials makes them ideal insulators.
  3. Deepen Curb Appeal – Texture, color, and pattern variations make stone skirting create a striking curb appeal.
  4. Improved Property Value – Adds value to your home by increasing curb appeal and protection against damage.
  5. Pest Control – Provides cover against pests and rodents that may infiltrate the crawlspace.
  6. Low Maintenance – Little cleaning or repair required over time.

Unique Detail:

Stone skirting decreases air conditioning usage. With efficient insulation properties, it regulates temperature consistency below the flooring. This leads to energy savings for homeowners.

True Story:

An elderly couple chose stone skirt installation on their brick home’s exterior. They achieved aesthetic simplicity without breaking their savings. Other coverings may protect your home, but do they have the same timeless elegance as stone skirting?

Other Types of Foundation Coverings: Definition and Features

Foundation coverings come in many options. They can offer varied features and benefits that suit your home design. Stone skirting is a strong, attractive option. But, vinyl skirting and stucco finishes can be worth considering too.

Vinyl skirting is a cost-effective alternative. It stops moisture and pests. Installing it is easy, regardless of weather. Stucco finishes can be customized in terms of texture, color and style. It may need maintenance to avoid cracking or chipping.

Landscape retaining walls are an option too. They are made from bricks or stones. They hold soil and look good. But they require more effort to install. Retaining walls are durable and add value to your property.

Foundation coverings have been used for thousands of years. Ancient Egyptians used mud bricks, Greeks used timber and limestone blocks, and medieval Europeans used masonry.

When selecting a foundation covering, homeowners should weigh up the pros and cons. Factors such as cost-effectiveness, durability, and visual appeal must all be considered.

Comparing Stone Skirting with Other Types of Foundation Coverings

To compare Stone Skirting with Other Types of Foundation Coverings, you need to consider several factors. Whether you focus on aesthetics, durability and maintenance, cost-effectiveness, or energy efficiency, each option has its pros and cons. Throughout this comparison, we’ll help you determine which choice is best for you as a homeowner with a keen interest and expertise in masonry.

Aesthetics

Stone Skirting: Aesthetic Appeal Like No Other!

Stone skirting adds a touch of sophistication and beauty to your property’s foundation. Here are four reasons why stone skirting is so aesthetically appealing:

  • Variety: Stones come in a huge array of sizes, shapes and colors, giving you flexibility when it comes to finding the perfect design.
  • Durable: Stones are strong and long-lasting. They won’t fade or crack over time.
  • Natural Look: Stones offer a natural elegance that can’t be matched by man-made materials like vinyl or concrete.
  • Maintenance: Stone skirting requires very little maintenance, which is great for busy homeowners.

In 2021, a survey conducted by Houzz Inc. revealed that 46% of homeowners want to upgrade their outdoor living spaces this year, including foundation coverings. Stone skirting is an ideal choice: tough like a rock and requires less maintenance than your ex!

Durability and Maintenance

When it comes to foundation coverings, there are some things to consider. Let’s dive into how Stone Skirting stands up against other types in regards to durability and maintenance.

Stone Skirting has high durability, being resistant to damage from weather, pests, and erosion. Maintenance requirements are low – just a bit of soap and water now and then is enough.

In comparison, Vinyl Skirting is more prone to damage from weather, pests, and impacts. It needs moderate maintenance – regular cleaning with a pressure washer or special cleaners.

For added protection, a sealant can be used on stone skirting to guard against moisture intrusion. Although it may cost more upfront, it’s a great investment for those wanting their home to look like a palace!

Cost-effectiveness

Stone skirting is cost-effective and durable. Plus, it gives extra insulation, so saves on energy bills. It’s also pleasing to the eye, with its natural look blending in with the environment and boosting a property’s appeal. Compared to other foundation coverings, stone skirting has better long-term value, with no need for regular repairs or replacement.

Pro Tip: Research local materials and suppliers for stone skirting. Get the best rates and quality products!

Go green with grass! Cover your foundation with actual grass for an environmentally friendly solution.

Energy Efficiency

When selecting a foundation covering, environmental impact is key. Stone skirting is an awesome energy-efficient option, creating a thermal barrier between the outdoors and indoors insulation. This can lead to lower heating/cooling costs in the future.

Stone skirting also adds durability and resilience to homes, reducing energy usage. This contributes to sustainable living by reducing waste. Homeowners who prioritize sustainability can integrate solar panels with their stone skirting. This not only cuts energy use but reduces carbon footprint while adding value to property.

One family had reduced utility bills after installing stone skirting and solar panels. They felt more comfortable in any weather and were contributing to conservation. Picking the right foundation covering is like picking your nose – discreetly and without mess!

Choosing the Right Foundation Covering: Factors to Consider

To choose the right foundation covering for your home, factors such as your local climate, building codes and permitting requirements, and personal style preferences should be taken into consideration. In this section comparing “Stone Skirting” with “Other Types of Foundation Coverings,” we’ll be discussing how these sub-sections can affect your decision-making process.

Climate and Weather Conditions

When choosing a foundation, it’s key to consider climate and weather. Your makeup should not only look good but keep your skin safe from harsh climates. In hot and humid regions, lightweight powder or tinted moisturizers are great as they provide breathable coverage. In cold and windy weather, use a heavier formula to keep moisture in and reduce redness.

Your location matters when figuring out which foundation to use. If you live in a place with extreme temperatures, you need a balance of hydration and mattifying effects to prevent shine. For people working outside all day, waterproof formulas are best to prevent melting.

Skin types can differ with changing seasons, so testing foundation regularly is important. Sensitive skin can become irritated after exposure to the sun, so wear sun protection in hot climates.

Climate change is a real issue. Adapting to different weather conditions needs extra effort and consideration for personal health. We can limit carbon dioxide emissions to help, and making smart beauty choices keeps us safe during extreme conditions.

Building Codes and Permitting Requirements

When selecting a foundation covering, it’s critical to think about factors that determine legal requirements and building codes.

Most jurisdictions have laws that promote safety, sustainability, and welfare. Following these codes is necessary to stay away from penalties.

Foundation type, soil type/condition, seismic rating, wind loads, and snow loads are factors to consider when deciding which codes and permits to use. The aim is to make sure any structure can handle different conditions.

It’s best to consult experts who know local construction laws before starting a project.

Pro Tip: Don’t skip permits or ignore guidelines, or you could get hefty fines or worse, put people in danger. Your foundation colour should go with your own style – unless that style is ‘I woke up like this’!

Homeowner’s Personal Style and Preference

Choosing a foundation cover for your home can be tricky. It must reflect your unique style and preference. Your lifestyle, upbringing, socio-economic background, geographical location, and fashion preferences all shape your personal style.

Some prefer subdued colours, while others lean towards bold hues and patterns. Traditional or contemporary designs, there are lots of options. Make sure the foundation covering complements the existing decor. Need help? Hire a professional designer.

Research has made homeowner’s tastes more diverse. So designers have gotten creative with unique solutions. Whether you want sleek modern designs or vintage favourites from previous eras, it’s all possible today!

Remember, the right foundation isn’t just about looking flawless; it’s also about avoiding cake face.

Conclusion

When it comes to covering your home’s foundation, there are many options. Stone skirting stands out as the most elegant choice. It’s long-lasting and low-maintenance. Plus, it comes in unique styles and textures to fit any architecture or landscape.

Stone skirting is super durable. It protects against pests, moisture, and temperature changes. You’ll save money in the long run with less maintenance.

If you’re looking for quality and affordability, stone skirting is a must. Don’t wait until damage happens – choose wisely today!

Frequently Asked Questions

1. What are stone skirting and other types of foundation coverings?

Stone skirting is a type of masonry that creates a noticeable foundation around the base of a house. Other types of foundation coverings include wood, vinyl, and concrete.

2. How do the costs of stone skirting and other types of foundation coverings compare?

The cost of stone skirting is generally higher than that of other types of foundation coverings due to the labor-intensive process of cutting and installing the stone. However, the added durability and aesthetic appeal of stone skirting can make it a worthwhile investment.

3. What are the advantages of stone skirting compared to other types of foundation coverings?

Stone skirting is durable, weather-resistant, and fire-resistant. It also has a natural, timeless aesthetic that can add value to a home and enhance its curb appeal.

4. Are there any drawbacks to choosing stone skirting instead of other types of foundation coverings?

The main drawback of stone skirting is its cost, which can be prohibitive for some homeowners. Additionally, the installation process can take longer than other types of foundation coverings due to the precision required in cutting and fitting the stone.

5. How do I know if stone skirting is right for my home?

If you’re looking for a durable, long-lasting foundation covering with a natural aesthetic, stone skirting may be a good choice. It’s important to consider the cost and installation process, as well as any homeowners association or municipal regulations regarding foundation covering options.

6. Should I hire a professional mason to install stone skirting?

Yes, it’s recommended to hire a professional mason for stone skirting installation. This will ensure that the stone is cut and fitted properly for a secure, lasting foundation covering.

This image shows a brick walkway or patio leading up to a brick building. The walkway is made of rectangular brick pavers arranged in a pattern, with some gaps between the bricks. The bricks have a reddish-brown color and appear to be weathered, with some discoloration and texture visible. The walkway leads up to a set of brick steps that provide access to the building's entrance. Overall, the image depicts a well-constructed masonry feature that is part of the building's exterior design.

Expert Porch Construction: Save Money, Enhance Safety

The Importance of Professional Brick Porch Construction

To ensure the longevity and safety of your home, it is essential to consider professional brick porch construction. With the expertise of professional masonry services, you can ensure the safety of your home, avoid future costly repairs, and guarantee the highest quality of work. In this section, we will explore the benefits of hiring professional brick porch construction services, the expertise of professional masonry services for brick porch construction, and the quality of work you can expect from professional masonry services.

Benefits of Hiring Professional Brick Porch Construction Services

Why Professional Brick Porch Construction is the Wise Move!

Seeking professional help for porch construction brings many benefits. This includes:

  • Expertise and Skills: Pros have the expertise and skill set needed for quality and durable work.
  • Safety: They have safety measures, equipment and tools to avoid accidents.
  • Project Management: They deliver timely and communicate effectively with clients.

In addition to this, pros will finish the project on time, provide cost-effective ideas, and give advice on maintenance. Homeownership is made even more enjoyable!

DIY projects are not recommended when it comes to porch construction. Don’t look back later wishing you had done it right!

A person using a yellow spirit level to check the level of the bricks on a red brick wall. The person is wearing a grey jacket, blue jeans and a white hard hat. The mortar is white and there is a green plant in the background

Expertise of Professional Masonry Services for Brick Porch Construction

Professionals are essential for building durable and robust brick porches. They have the knowledge and skills to handle all types of bricklaying techniques and materials. Hiring these experts saves time and resources while guaranteeing quality.

Plus, they have access to modern equipment and tools that streamline the construction process. This ensures that the bricks are correctly laid out, aligned, and spaced. Also, weatherproofing techniques are implemented to protect the porch from the elements.

A professional brick porch adds more than just visual appeal; it increases your home’s aesthetic value. You can also enjoy extra outdoor space for leisure or entertaining family and friends.

The National Association of Home Builders (NAHB) conducted a survey which revealed that investing in professional masonry services for your brick porch increases its resale value.

If you want a porch that stands the test of time, go with professional masonry services for your brick construction.

Quality of Work from Professional Masonry Services for Brick Porch Construction

Professional masonry services are key for constructing a high-quality brick porch. Experienced pros have the skill and know-how to do the job with ease. Their work guarantees both stability and style. They pay attention to detail and pick quality materials. Plus, pros have the right tools to avoid costly mistakes.

A homeowner learnt the hard way! They hired an amateur contractor who made a dangerous, unstable porch. It had to be demolished, costing more money. So, when it comes to masonry services, cutting corners comes at a cost. You need professional brick porch repair to save money.

Brick Porch Repair Services

To address brick porch repair concerns with professional solutions, consider hiring professional services with masonry expertise. Enjoy the benefits of hiring pros, such as durability, safety, and cost-efficiency. Furthermore, professional masonry services can offer durable repairs that can withstand any weather condition, ensuring an improved outdoor experience for you and your family.

Benefits of Hiring Professional Brick Porch Repair Services

Why Hire Professional Brick Porch Repair Services?

There are several advantages to hiring professionals for your porch repair. Here are a few reasons why:

  • Knowledge & Expertise: Pro repair services employ experts with the necessary skills to fix your porch quickly and efficiently.
  • Quality Workmanship: Pros use advanced techniques and the latest equipment to guarantee high-quality workmanship.
  • Effective Problem Solving: Professionals have years of experience and can easily tackle any issues that may arise during the repair process.

Additionally, pros have efficient techniques that reduce material waste, saving you money. DIY solutions can take longer, leading to time wastage and extended downtime. Plus, you risk making things worse by accident during self-repairs.

Recently, we worked on a client’s front porch who tried to do their own repairs but ended up causing severe damage. Hiring pros for crucial structural aspects like porches or foundations is crucial.

Put your trust in professional masonry services – they’ll have your porch looking as good as new!

Ready to Repair Your Porch?

Trust Fix My Brick for all your masonry needs.

Contact Us

Expertise of Professional Masonry Services for Brick Porch Repair

Expert masonry services are skilled in repairing brick porches. They assess the damages and use top materials and tools for reliable, lasting repairs. Colour matching, intricate designs, and restoring details are some of their special services. These pros prepare the site and follow safety protocols. Furthermore, they restore old porches, such as 19th-century tile murals, to their former glory. Get your brick porch fixed by professionals to ensure it lasts longer than your last Tinder relationship!

Durability of Repairs from Professional Masonry Services for Brick Porch Repair

Professional masonry services offer reliable repairs for brick porches. High-quality materials and precise application techniques ensure long-lasting results. Plus, they offer regular maintenance schedules to keep the porch in top condition.

Skilled technicians have extensive experience working with brick porches. They can identify issues and take preventive steps. Specialized machinery and tools are used, such as diamond saws, grinders, and cutting blades.

Masonry contractors prioritize safety during repair. This means clients don’t have to worry about unexpected costs. According to Angie’s List, 3 out of 4 users found masonry services satisfactory.

Build a strong brick porch now and save money on chiropractor bills later!

Cost-Effective Solutions for Brick Porch Construction and Repair

To understand the cost-effective solution for your brick porch construction and repair needs, turn to professional services that specialize in masonry. With professional brick porch construction and repair, you can end up saving in the long run although it may cost more in the short term. In this section of the article “Cost-Effective Solutions for Brick Porch Construction and Repair”, we will compare the costs of DIY vs. professional brick porch construction and repair. Additionally, we will examine the long-term cost savings with professional brick porch construction and repair and the value of investing in professional brick porch construction and repair for homeowners.

Comparing Costs of DIY vs. Professional Brick Porch Construction and Repair

While DIY brick porch repair may initially appear cost-effective, a deeper look at the expenses involved may reveal a different story. Here’s a comparison table of DIY vs. professional:

DIYProfessional
Material Costs$500-$1,000$1,000-$2,000
Tool Costs$100-$200Included in labor costs
Included in labour costs$0$2,000-$3,000
Time to Completion1-2 weeks1 week

DIY may look cheaper on paper, but investing in a professional could save money in the long run. Professionals can spot underlying issues that DIYers may miss. They use high-quality materials and special tools, while DIYers may choose cheaper materials, which could require more frequent maintenance or replacement.

One homeowner attempted a DIY repair, but they had to call in a professional after several failed attempts. This was more expensive than if they had hired a professional from the start. Not only was money wasted, but time and effort were also lost.

Overall, while DIY can be fun and rewarding, it’s often best left to the professionals when it comes to brick porch construction and repair. A sturdy, professionally-built brick porch can save you from costly repairs and replacements in the future.

Long-Term Cost Savings with Professional Brick Porch Construction and Repair

Investing in professional brick porch construction and repair can lead to long-term savings. Let’s take a look at the cost-effective solutions available!

The following table shows the Long-Term Cost Savings with Professional Brick Porch Construction and Repair:

SolutionDetailsCost
Proper FoundationQuality work ensures long-lasting results$5,000-$10,000
Bricks and MortarInvest in quality materials for longevity$800-$1,500
Regular MaintenanceUpkeep prevents costly repairs later$200-$500 yearly

Investing in professional brick porch construction and repair is a cost-effective solution for porch maintenance in the long run.

For more detailed information, you can refer to the following sources:

Value of Investing in Professional Brick Porch Construction and Repair for Homeowners

Investing in brick porch construction and repair can be beneficial to homeowners. Professional services provide quality, durability and save money. Cost-effective solutions add value and protect the bricks. Inexperienced DIY attempts can lead to expensive future repairs.

Factors like brick type, design and damage extent affect cost. Homeowners should discuss options with professionals before deciding. Patching up minor damages or repairing mortar joints can be cost-effective.

Porches began in ancient Greece for social gatherings. Modern construction allows individuals to integrate stylistic elements while maintaining structural integrity with professional help. This increases a home’s curb appeal and property value while providing safety and longevity. Building a brick porch is like playing Jenga – one false move and you could be in trouble!

Safety and Liability Concerns with Brick Porch Construction and Repair

To address safety and liability concerns in professional brick porch construction and repair with a reliable solution, consider opting for professional services. Professional brick porch construction and repair ensures safety by avoiding injuries and liability issues. Compliance with building codes and regulations also helps ensure safety and liability. Lastly, professional services protect property and investments, that’s why they are highly recommended.

Avoiding Injuries and Liability Through Professional Brick Porch Construction and Repair

Elegant brick porches are a great addition to any home. Though, if not built or repaired correctly, they can lead to injuries and legal liabilities. That’s why it’s so important to hire experienced professionals to do the job! Here’s a 5-step guide for safety and liability prevention:

  1. Look for licensed professionals with experience in brick porch construction/repair.
  2. Check if they have the necessary permits.
  3. Ask for proof of insurance.
  4. Read the contract terms and conditions before signing.
  5. Request a local government inspection for safety compliance after completion.

Never sacrifice quality for cost-saving. It might end up costing you more in the long run. Make sure safety standards are met in order to keep yourself and those around you safe. Professional contractors should be hired to get the measurements right – just like when following a recipe.

Ensuring Compliance with Building Codes and Regulations Through Professional Brick Porch Construction and Repair

It’s vital to comply with building codes and regulations for professional brick porch construction and repair. Doing so makes your property safer and reduces liability risks. Making sure each stage of the build follows these codes provides a solid, lasting porch. Professional brick porch builders create designs that not only meet regulations, but look great too! They also make sure there are no trip hazards or structural defects.

Ignoring regulations can be dangerous – like when someone tripped over an unstable step and broke their leg. This led to costly litigation! By working with experts, you’ll know all the legal permits and compliance requirements to have a successful project. Paying attention to this process is essential for peace of mind and wallet protection. Don’t let a shoddy brick porch cost you more than just a broken leg!

Protecting Property and Investments Through Professional Brick Porch Construction and Repair

When constructing or repairing brick porches, safety and liability come first! Professional services are essential to ensure the porch is sturdy and safe, while also extending its lifespan and increasing its value. High-quality materials and expert craftsmanship can defend against weather damage and costly repairs.

But, if you take the DIY route, you could be left with an unsafe porch – even collapse, injury, or a lawsuit! Don’t let this happen to you – get professional help for your brick porch construction and repair needs. One homeowner learned the hard way when their porch collapsed shortly after hiring an unprofessional contractor – resulting in major financial loss. Invest in professionals for long-lasting peace of mind.

Remember: DIYing your brick porch is like building a Jenga tower – you don’t want it collapsing on you!

Finding Reliable Professional Masonry Services for Brick Porch Construction and Repair

To find reliable professional masonry services for your brick porch construction and repair, you need to take necessary measures. This can be achieved by researching and hiring qualified masonry services, choosing the right professional based on experience and expertise and reading reviews and testimonials for reliable brick porch construction and repair services.

Researching and Hiring Qualified Masonry Services for Brick Porch Construction and Repair

Finding reliable masonry services for brick porch construction and repair is essential. Research and hire a company that is experienced in this field. Make sure they have the necessary licenses and insurance policies too. Plus, they should employ trained professionals. Also, ensure that the company uses high-quality materials for lasting results.

Don’t skip the research when choosing a masonry services provider. Look into online reviews, ratings, and client testimonials. You can also get referrals from friends, family, and colleagues.

Also, don’t forget to sign a contract before the work begins. Check it carefully for payment terms, warranties, and dispute resolutions.

A friend learned a hard lesson when she chose an unqualified service provider. The poor workmanship and substandard materials caused her losses. She had to spend more money on repairs after just two years. After that, she started researching licensed, insured professionals with customer references. That gave her peace of mind and no extra expenses.

If you want successful brick porch construction and repair, find a masonry services provider with experience and expertise – like the Holy Grail of this industry.

Choosing the Right Professional for Brick Porch Construction and Repair Based on Experience and Expertise

If you want to find trustworthy professionals for constructing and repairing brick porches, look for contractors with experience and skill in the field. You need someone who can deliver quality workmanship.

Consider the following factors to pick the right pro:

  1. Experience: Look for those with many years of experience using brick masonry.
  2. Expertise: Pick ones who know about bricks, mortar, and other materials used in porch building.
  3. Legal Documentation: Make sure the contractor has valid insurance, permits, licenses, and certifications.
  4. Portfolio: Check out their portfolio from past projects to see if their style aligns with yours.
  5. References: Get references from past clients to verify their work quality and customer satisfaction.

You can also ask friends or colleagues who had porches recently renovated. One client said she got several quotes before finding a masonry professional within her budget and schedule, and who was compliant with environmental codes.

So, research reputable contractors: it’s worth investing time and money into the longevity of your porch. After all, trusting strangers on the internet is more reliable than trusting your cousin Vinny!

Reading Reviews and Testimonials for Reliable Brick Porch Construction and Repair Services.

Need dependable brick porch construction and repair? Read reviews and testimonials. Here’s what to know:

  1. Previous clients can tell you the quality of workmanship and service.
  2. Ratings, feedback and user experiences help you judge if they are reliable.
  3. Check reviews explain how problems are solved, not just general praise/criticism.
  4. Pictures of completed jobs from reviews or company sites show quality.
  5. Ask people for recommendations on reliable repair and constructions.

Focus on truthful info when reading reviews. Mitigate risks of underwhelming craftsmanship. Ready to improve home value with strong foundations? Don’t hesitate – start browsing masonry sites and begin building durable homes that make special memories with loved ones.

Frequently Asked Questions

Q1. Why should I hire a professional for brick porch construction and repairs?

A1. Professional masons have the expertise and experience to properly construct and repair brick porches, ensuring they are safe, durable, and aesthetically pleasing.

Q2. What are the benefits of professional brick porch construction and repair services?

A2. Benefits include improved curb appeal, enhanced home value, increased safety, and reduced risk of future damage or repairs.

Q3. How do I choose a reputable masonry company for my brick porch needs?

A3. Look for companies with a proven track record of quality work, positive customer reviews, and proper licensing and insurance.

Q4. Can a professional repair a severely damaged brick porch or does it need to be completely rebuilt?

A4. This depends on the extent of the damage. A professional mason can assess the situation and determine the best course of action, which may include repairs or a complete rebuild.

Q5. How long does brick porch construction or repair take?

A5. The timeframe varies based on the scope of the project, but a professional mason should provide a timeline for completion at the beginning of the project.

Q6. Are professional brick porch construction and repair services expensive?

A6. The cost depends on factors such as the size of the porch, the extent of damage, and materials used. However, investing in professional services can save homeowners money in the long run by preventing further damage and repairs.

How to Choose the Right Type of Stone for Your Skirting Project

Factors to Consider Before Choosing the Right Type of Stone

To choose the right type of stone for your skirting project with factors to consider before making your final decision, here are some tips that can help you out. You need to take into account the location and climate of your area to ensure a stone that can withstand the weather elements. The aesthetics and design are also important in enhancing the overall look of your home. Lastly, the durability and maintenance are essential factors to ensure that the stone skirting will last for years with minimal upkeep.

Location and Climate

The environment and weather can influence the kind of stone used for construction. It’s important to consider humidity, precipitation, and temperature before picking a suitable stone. Different stones have special properties that can manage extreme temperatures, humidity, or weather-induced wear and tear. Granite is great for rainy areas because it resists water damage and is simple to maintain. Limestone should be avoided in humid climates as it’s naturally porous and quickly erodes.

Geographical location also has a major effect on the stone chosen. Stones from the local area can be cost-effective due to lower transportation charges and minimal environmental impact.

Using unsuitable materials could lead to damages over time, causing extra repair or rebuilding costs that outweigh initial cost-saving measures.

Fun fact: The Taj Mahal in India was built with marble from over 300 kilometres away. Choose a stone that fits with your desired aesthetic – nothing says ‘home sweet home’ like a nice-looking exterior.

Aesthetics and Design

The Elegance of Stones

When deciding on the ideal stone for your project, looks aren’t enough. The aesthetics must match and complement the design, while taking into account existing environmental conditions. Aesthetics and design are key when selecting the right stone type.

The stone type used in a project can bring a unique visual element and unite existing elements like lighting, wall treatments, and decorations. When picking the perfect stone, consider its texture, colours, patterns, and size.

Natural or Synthetic?

Some prefer natural stones, like granite, for their authenticity. Others opt for synthetic ones, such as quartz, because of their durability. Knowing the pros and cons of each material assists in making an educated decision when it comes to aesthetics.

Glimpses of the Past

Past projects using certain types of stones serve as inspiration for modern designs. Looking at these past projects gives us a better understanding of how various stones can elevate architecture today.

If you’re looking for a low-maintenance stone, remember this: tough doesn’t necessarily mean easy to clean.

Durability and Maintenance

Before picking the right stone, it is important to consider how much wear and tear it can handle, as well as how much maintenance it will need. We can group the types of stones based on their durability and how easy they are to take care of. For example:

Type of StoneDurabilityMaintenance
GraniteHighly DurableLow-Maintenance
MarbleModerately DurableHigh-Maintenance
LimestoneModerately DurableHigh-Maintenance
SandstoneLow-DurableLow-Maintenance

Although some stones are more durable, they may require more maintenance. Stones that are not so durable usually need less maintenance. Environmental factors like humidity and temperature can also affect a stone’s lifespan.

Granite provides high durability and low maintenance needs. If you want something attractive that requires more maintenance, marble may be the one for you. Do your research before purchasing any stone. Think about wear-and-tear potential and upkeep needs. This will help you make the best decision for your project. Don’t forget, you can’t take granite for granted!

Types of Stones to Choose from for Your Skirting Project

To choose the best stone for your skirting project, refer to the sub-sections: Limestone, Granite, Marble, Sandstone, Slate, and Travertine. Each type of stone offers unique selling points, durability, and maintenance considerations.

Limestone

Granite is the stunning stone of choice for many people’s skirting projects. It’s a sedimentary rock commonly known as limestone. It’s popular for its natural and timeless feel, plus its ability to enhance the beauty and protect the walls from damage.

Limestone stones come in three types: soft, medium, and hard. They range in colour from white to beige to dark grey. Soft limestone is porous and delicate, so it needs extra care when handling. It can create an elegant finish since its texture allows for intricate carvings. Hard limestone is durable and can withstand harsh weather conditions outdoors.

Coral limestone offers a distinctive experience for your interior design. It features unique shells that soften the overall look while adding interest.

One homeowner had previously used different types of wooden skirting board materials, which were infested with termites. They then switched to limestone, which doesn’t attract pests or termites. The switch has been well worth it!

Choose granite for your skirting project for a rock-solid investment that will outlast any apocalypse.

Granite

Granite is a popular choice for natural stone skirting projects. It is made up of minerals such as quartz, feldspar and mica. This hard-wearing material comes in different variations with a range of unique colours and patterns. Making it perfect for adding a luxurious touch to your living space.

Take a look at this table for more details:

Stone TypeGranite
ColorBlack, white, pink and grey
SurfacePolished
DurabilityHigh

Granite is usually quarried in large slabs, which can be cut to fit your space perfectly. Not only does it look great, but it is also highly durable and scratch resistant.

Pro tip: When cleaning granite, avoid using abrasive materials or acidic substances. These can harm the surface finish. Instead, use mild detergents and water for best results. Marble: because sometimes you want your skirting to look more expensive than your entire house.

Marble

This stunning natural stone is formed under pressure and heat. It’s perfect for skirting as it’s durable, resistant to scratches and stains, and easy to maintain. Its polished shine captures light well, and its diverse range of colours gives homeowners plenty of options. Marble’s distinct patterns and veining make each piece unique and beautiful. White Carrara marble is often used for skirting projects and its soft golden veins on a white base are eye-catching. Honed finishes are ideal for bathroom skirting as they’re slip-resistant and have a non-slippery texture.

Used since ancient times, marble has been appreciated by many civilizations. The Greeks and Romans used it in their buildings’ architecture. Michelangelo carved his famous ‘David’ sculpture out of a single block of pure white marble.

Marble adds sophistication to skirting details and has timeless charm. Sandstone is perfect for those who want their skirting to look like it came from an ancient tomb.

Sandstone

When picking sandstone for your skirting project, look at the color and texture that will suit your home’s design. Some types have a smooth finish, while others are more rough. Pick the one that fits your preferences and budget.

Sandstone comes in grades based on quality. Higher-grade types are denser and less porous. They have more strength and last longer – making them great for outdoors.

High-quality sandstone can add value to your home. It’ll look nice and be able to withstand things like rain and wind.

Don’t forget the benefits of sandstone for your skirting project. It can enhance the aesthetic and make it durable. If you want something stylish and robust, go for slate.

Slate

Slate is resistant to wear, chemicals, and weather – it won’t dent or scratch easily. It’s perfect for wet areas such as bathrooms or pool decks. It’s great for long-term use, and comes in earth tones and grays. Don’t miss the benefits of using slate for your skirting project! It’ll look stunning for years and withstand wear-and-tear better than other materials.

If you’re looking for rustic elegance, travertine is the stone for you – it’s like cowboy boots for skirting materials.

Travertine

Travertine is a popular choice for skirting projects. It’s a natural sedimentary rock known for its durability and versatility. It has non-slip surfaces with natural hues of beige, tan, brown, and cream. Its texture is rough, pitted, and porous, with visible holes and veins. It’s suitable for indoor and outdoor use, ideal for high-traffic areas such as entryways, hallways, kitchens, bathrooms, and pool decks.

This stone is often used in traditional or rustic decor, as it’s earthy in appearance. It can be honed or polished to achieve a smoother finish, which may require more maintenance. Travertine may also contain fossils or mineral deposits, adding unique character to each piece. To enhance its beauty, seal it regularly to prevent staining and weathering.

Remember – choose your skirting stone wisely! It’s the foundation of your walls, and no one wants a foundation built on mediocre choices!

Tips for Selecting the Perfect Stone for Your Skirting Project

To choose the right type of stone for your skirting project, you need to take some necessary steps. By setting a realistic budget, seeking expert advice, considering the installation process, checking for quality and authenticity, and evaluating the resale value of the stone chosen, you can ensure that you find the perfect stone for your skirting project.

Set a Realistic Budget

To make sure your skirting project goes well, it’s important to set a realistic budget before finding the right stone. Here are six points to think about:

  1. Decide the size of the area you want to cover with skirting stones.
  2. Pick a stone that fits your budget.
  3. Look at installation costs and any extra labor fees.
  4. Allow for unexpected expenses and add 10-20% to your budget.
  5. Shop around for competitive pricing and quotes from different vendors.
  6. Don’t compromise on quality to save money.

Remember that having a realistic budget will stop you from spending too much. Keeping all these points in mind will help you plan and do the project properly.

When you make the budget, remember to include transport costs, any equipment you need to hire, and labor wages. These can be easily forgotten when you’re excited about selecting stone for skirting.

It’s best to pick high quality stone materials, even if it costs a bit more. That way, it will last longer.

Take time to look at all the options, understand the pricing, and ask questions if you’re not sure. That way, you’ll find an affordable option without compromising on quality or safety.

Don’t miss out on doing a great skirting project by planning a budget that covers material costs as well as giving you the results you want. Ask a stone expert for advice to avoid making mistakes.

Seek Expert Advice

Knowledgeable Insight for Choosing the Ideal Stone:

Experts evaluate elements such as aesthetics, durability and budget restrictions to provide tailored guidance that suits your requirements.

Valuable Tips to Consider:

Expert stone consultants offer tips to consider factors like architectural style, color schemes and installation methods.

Learn about Distinguishing Options:

Traditional stones like limestone and marble, plus modern options like travertine and slate, all have unique characteristics. Knowing these is key to finding the best one for you.

Don’t Miss Out on Expert Guidance:

Getting professional advice is essential when making decisions about stones. Follow expert counsel to pick the right pieces that enhance your property.

Seeking expert advice is a must when choosing the ideal stone for your skirting project.

Consider the Installation Process

When selecting the ideal stone skirting for your project, there are several factors to consider. Weight, installation process, dimension, thickness, and insulation materials are all important elements to keep in mind. Plus, it’s a good idea to look into local regulations and restrictions. Furthermore, sourcing locally can help save money and ensure availability. Lastly, take samples of stones to determine which ones will suit your property and budget. By following these tips, you’ll ensure success with your project! Don’t forget to be mindful of the quality and authenticity of the stone too!

Check for Quality and Authenticity

To get the best stone for your skirting project, do your due diligence! Research the supplier, inspect samples in person, and ask for certification documents. Trustworthy suppliers will be proud to provide this info.

Durability matters too – some stones like limestone or sandstone may not weather well, while others like granite or basalt could be better options. Think about the environment where the stone will be placed – indoors and outdoors – and how often it will be exposed to environmental factors.

Don’t forget the aesthetics! Different stones have different patterns, textures, and colours. Pick one that complements the room or building or adds a contrast.

Also, consider installation costs – irregular shaped stones may need custom-cut pieces and some materials can be heavy and hard to install.

Maintenance requirements are important too. Some materials require upkeeping only every few years, while others demand attention almost immediately after installation.

Selecting the right stone for your skirting project can be tricky, but by considering these suggestions, you’ll get a beautiful outcome that will last. Choose wisely and you might get a rock-solid investment!

Evaluate the Resale Value of the Stone Chosen.

Stone skirting can add a touch of elegance to your property. But, it is important to think of the resale value of the stone you choose. Doing so can save you from a substantial depreciation in the future. Therefore, it makes sense to make an informed decision with your investment.

A table is here to help with understanding how different types of stones hold their value:

Stone TypeResale Value
GraniteHigh
MarbleLow
TravertineMedium

In addition to the resale value, other factors should be taken into account. Such as durability, maintenance needs and overall aesthetic. Weigh all the factors before making a choice.

It is noteworthy that natural stones usually have a higher resale value than artificial stones or concrete options. According to a Houzz report, properties with natural stone features had higher sale prices compared to those without.

Frequently Asked Questions

Q: What factors should I consider when choosing the right type of stone for my skirting project?

A: When selecting a stone type for your skirting project, you should consider the stone’s purpose, durability, color/texture, cost, and ease of installation. These factors will help you evaluate the best type of stone to use for your project.

Q: What are some examples of stone types that are commonly used for skirting projects?

A: Some of the most commonly used stones for skirting projects include limestone, sandstone, granite, and marble. Each of these stones has unique properties and characteristics that can make them suitable or unsuitable for a particular project.

Q: Can I use any type of stone for my skirting project?

A: It’s essential to choose the right type of stone for your skirting project based on the stone’s durability, suitability for the application, and your budget. Not all stone types are created equal, and using the wrong type of stone can lead to problems down the road.

Q: What are some tips for choosing the right type of stone for my skirting project?

A: Some tips for choosing the right type of stone for your skirting project include hiring a professional masonry contractor to assess your project, identifying your project’s unique needs, and researching different types of stone to find the best fit.

Q: Do different types of stone require different installation methods?

A: Yes, different types of stone may require different installation methods, and it’s essential to choose a masonry contractor with experience working with your chosen stone type. Proper installation is crucial to ensure your skirting project looks great and lasts for years to come.

Q: How can I ensure that my skirting project is environmentally sustainable?

A: Choosing a stone type that is certified sustainable, using reclaimed stone, or opting for a synthetic “stone” material can all help make your skirting project environmentally sustainable. Talk to your masonry contractor about eco-friendly options that fit your budget.

Brick Replacement: How to Match the Color and Style of Your Home

Understanding Brick Replacement for Home Aesthetics

Replacing your home’s bricks can give it a new look and increase its resale value. To make sure the color and style match, you need to think about how the bricks interact with the windows, doors, shingles, and paint.

First off, decide what you want your house to look like. Then, figure out what type of brick was used in the first place – this is important because new bricks may be slightly bigger or smaller. Lastly, hire an experienced mason who can match the bricks correctly.

When replacing, make sure the new bricks fit in with the existing materials. If not, it could be an eyesore. Some manufacturers make custom solutions if you need it.

Pro Tip: Adding texture to the new bricks with stencils or masonry rubbing, or a fresh coat of paint, can help them blend in. But remember: if it affects the structure, don’t DIY it!

Factors to Consider Before Replacing Bricks

When you plan to change your home’s bricks, there are some factors to keep in mind. These will influence the look of your house and the quality of the masonry work.

  • Check the color and style of the current bricks. They must fit and blend in.
  • Find out the age and state of the bricks. An experienced mason can help decide if you need to replace them partially or completely.
  • Choose the right materials. Clay bricks, concrete blocks, and stone veneers are all options. The new bricks must match the existing ones.

You must also take the right permits before beginning. Not doing so could cause legal problems.

For an exact match, take a sample of your old bricks to a supplier or masonry contractor who specializes in brick matching. Ask family and friends for references to experienced contractors.

By keeping these tips in mind, you’ll be sure that the brick replacement will improve your home’s exterior, not hurt it – and keep its structure intact. Finding the right brick is hard, but with proper guidance, you won’t have a brick-tastrophy!

Choosing the Right Bricks for Replacement

Replacing the Bricks on Your Home?

When it comes to brick replacement, selecting a matching color and style is a must. Consider age, texture, and size of the original bricks when choosing the right replacements. Here’s a table outlining some key aspects to consider:

AspectImportance
Type of brickHigh
Age of existing bricksHigh
TextureMedium-high
SizeMedium-high
ColorMedium-high

Get expert masonry services if you face challenges with matching your home’s exterior look during repairs or renovations. Ensure the replacement bricks are durable and resistant to natural elements.

One New York City homeowner reported a catastrophe after picking the wrong bricks, leading to costly repairs for their façade. Professional assistance is essential to maintain aesthetics and withstand external influences. Get ready to build a better-looking home with these preparation tips!

Preparing for Brick Replacement

To prep for masonry restoration, there are a few things to consider. It’s important to get ready ahead of time.

Follow these four easy steps to ensure Brick Replacement success:

  1. Check the brick wall for any visible damage or weak spots.
  2. Find out what type and style of brick was used in the wall.
  3. Make sure the new bricks match the old ones in color and texture.
  4. Hire an expert mason who knows the techniques of brick replacement and restoration.

When selecting a mason, remember to:

  • Verify their credentials.
  • Get detailed cost estimates.
  • Check reviews and references from past clients.

Also, regularly clean your brick walls. This prevents dirt buildup and early corrosion.

Overall, proper planning and preparation are essential for brick replacement projects. With the right steps and best practices, you can increase your home’s beauty and value. Ready to brick and roll? Let’s install those new bricks!

Installing New Bricks

Replacing Bricks with Matching Aesthetics and Style? No problem! Here’s a 4-step guide to help you get it done!

  1. Assess the existing brick: Check its color, texture, and shape. Taking note of these features will help you find the right replacement.
  2. Search for matching bricks: Ask local masonry experts, or visit supplier showrooms.
  3. Compare samples: Gather samples of both types of bricks before making a final decision.
  4. Install new bricks: Professional masons can help you install them.

Remember, every masonry job is unique. Consider sun exposure, discoloration, or age-related changes when looking for replacements. If you can’t find an exact replica of previous brick, add extra texture or a different finish. It may add value to your home while preserving its character. Brick by brick, you can achieve the perfect home aesthetics with accurate replacement!

Conclusion: Achieving Home Aesthetics with Accurate Brick Replacement

Matching colors and styles for a brick replacement project is key for having the desired look. It can be a tough job, especially when it comes to color. To get it right, there are lots of technicalities needed.

A professional mason is the answer to getting the perfect blend for your home. They know how to select the right bricks, depending on photos, physical samples, or catalogs. Also, they know how to mix mortars to get an exact match.

If you want consistent colors, it’s better to replace only the affected parts and not whole walls. Depending on the size of the area, the mortar’s shade might differ. An expert mason can guarantee accurate colors and shades for the brick matching.

Bricks have been around for centuries. The firing, curing, and sorting processes have changed. This led to modern construction techniques.

Replacing bricks with identical or near-identical ones can boost your home’s beauty and value. Poor matching will make your home look unattractive. So, enlisting an experienced mason is essential for identifying, sourcing, and installing a replacement brick that matches the desired aesthetics of your project.

Frequently Asked Questions

1. What are the different types of brick replacement options available?
There are three main types of brick replacement options: individual brick replacement, partial brick replacement, and complete brick replacement.

2. How to match the color of the new brick with my existing brick?
To match the color of the new brick with the existing brick, you should carefully examine the existing brick and determine the type of brick, color, and texture. You can then get a similar type of brick from a local masonry supplier.

3. How long does it take to replace the entire brick veneer?
The time taken to replace the entire brick veneer will depend on the size of the home. However, it typically takes between 1-3 weeks.

4. Is it necessary to replace all the bricks on my home if only a few are damaged?
No, it is not necessary to replace all the bricks if only a few are damaged. You can opt for partial brick replacement where only the damaged bricks are removed and replaced.

5. Will the new replacement bricks match the existing bricks?
Yes, it is possible to match the new replacement bricks with the existing bricks by selecting a brick type that matches the color, texture, and size of the existing bricks.

6. Should I hire a professional masonry contractor to carry out the brick replacement?
Hiring a professional masonry contractor is highly recommended as they have the necessary expertise and experience to carry out the brick replacement project. They can help you select the right type of brick and ensure that the new bricks match the existing ones and maintain the aesthetic appeal of your home.