Owning a historic brick home is a point of pride for many homeowners. These architectural treasures offer unique charm, character, and a connection to the past that modern structures simply can’t replicate. However, when it comes to energy efficiency, older homes often fall short of contemporary standards. The challenge lies in improving energy performance without compromising the historic integrity of your beloved brick abode. In this comprehensive guide, we’ll explore methods to strike that delicate balance, ensuring your home is both efficient and true to its roots.
1. Non-invasive Insulation Options for Brick Structures
One of the most significant factors affecting energy efficiency in historic homes is inadequate insulation. However, adding insulation to a brick structure requires careful consideration to avoid damaging the building’s historic fabric.
Blown-in Insulation
Blown-in insulation is a popular choice for historic brick homes due to its non-invasive nature. This method involves injecting insulation materials into wall cavities through small holes, which can be easily patched afterward.
- Cellulose: Made from recycled paper products, cellulose is an eco-friendly option that can be blown into wall cavities.
- Fiberglass: Another common choice, fiberglass can be blown into walls and attics to improve insulation.
- Mineral Wool: This fire-resistant material is excellent for both thermal and sound insulation.
When considering blown-in insulation, it’s crucial to assess the condition of your brick walls and ensure they are free from moisture issues before proceeding.
Interior Insulation Methods
For homes where external modifications are restricted due to preservation requirements, interior insulation methods can be effective:
- Rigid Foam Boards: These can be applied to interior walls and covered with drywall.
- Spray Foam: While more invasive, spray foam can provide excellent insulation in hard-to-reach areas.
- Radiant Barriers: These can be installed in attics to reflect heat and improve overall energy efficiency.
Remember that adding interior insulation may slightly reduce room dimensions and could affect historic moldings or trim. Always consult with a preservation specialist before making significant changes.
2. Addressing Air Leaks Without Damaging Historic Materials
Air leaks can significantly impact your home’s energy efficiency. In historic brick homes, these leaks often occur around windows, doors, and where different materials meet. Addressing these issues requires a gentle touch to preserve original features.
Identifying Air Leaks
Before you can fix air leaks, you need to find them. Some methods include:
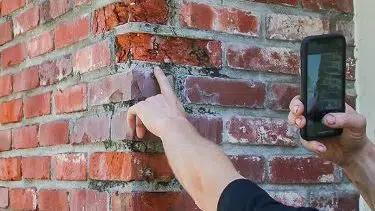
- Visual Inspection: Look for gaps, cracks, or areas where daylight is visible from inside.
- Smoke Test: Use incense or a smoke pencil to detect air movement near potential leak areas.
- Thermal Imaging: Professional energy auditors can use thermal cameras to identify areas of heat loss.
Sealing Techniques for Historic Homes
Once you’ve identified the leaks, use these preservation-friendly sealing methods:
- Weatherstripping: Add weatherstripping to doors and windows to create a tighter seal.
- Caulking: Use appropriate caulk to seal small gaps around windows, doors, and other openings.
- Draft Stoppers: Place fabric draft stoppers at the base of doors to prevent air infiltration.
- Chimney Balloons: Install removable chimney balloons to prevent heat loss when fireplaces are not in use.
When sealing, always use materials that are compatible with your home’s historic elements and can be easily removed if necessary.
3. Upgrading Windows and Doors in Historic Homes
Windows and doors are often the weakest points in a home’s thermal envelope. In historic homes, these elements are also frequently key architectural features that contribute to the building’s character.
Window Restoration vs. Replacement
Before considering replacement, explore restoration options for your historic windows:
- Weather Stripping: Add or replace weather stripping to improve the seal.
- Storm Windows: Install interior or exterior storm windows for added insulation.
- Glazing: Re-glaze windows to ensure a proper seal between the glass and frame.
- Repairs: Address rot, loose joints, or other issues to improve functionality and efficiency.
If replacement is necessary, look for high-quality, energy-efficient windows that match the style and proportions of the originals. Many manufacturers offer historic replicas with modern energy-saving features.
Door Upgrades
Historic doors can often be upgraded to improve energy efficiency:
- Weather Stripping: Add or replace weather stripping around the door frame.
- Threshold Seals: Install adjustable threshold seals to close gaps at the bottom of doors.
- Storm Doors: Add storm doors for an extra layer of insulation.
- Door Sweeps: Install door sweeps to prevent drafts from entering beneath the door.
If a door is beyond repair, seek out a replacement that matches the original in style and materials while offering improved energy performance.
4. Incorporating Modern HVAC Systems Sensitively
Updating the heating, ventilation, and air conditioning (HVAC) system in a historic home can dramatically improve energy efficiency. However, installation must be done carefully to minimize impact on the building’s historic fabric.
Choosing the Right HVAC System
Consider these energy-efficient options that can be integrated with minimal disruption:
- Ductless Mini-Split Systems: These require only small wall penetrations and can be zoned for different areas of the home.
- High-Velocity Systems: These use smaller ducts that can be more easily retrofitted into historic structures.
- Radiant Floor Heating: This can be installed under new flooring or in some cases, retrofitted beneath existing floors.
- Geothermal Systems: While more invasive to install, these systems offer excellent efficiency and can be a good long-term investment.
Sensitive Installation Techniques
When installing new HVAC systems, consider these approaches to minimize impact:
- Utilize existing chases, closets, or other hidden spaces for running ductwork or piping.
- Place outdoor units in inconspicuous locations to maintain the home’s historic appearance.
- Use period-appropriate grilles and registers that blend with the home’s aesthetic.
- Consider a phased approach to installation to spread out costs and disruption.
5. Balancing Efficiency with Preservation Requirements
When improving energy efficiency in a historic brick home, it’s essential to balance modernization with preservation. This often involves navigating local historic preservation guidelines and regulations.
Understanding Preservation Guidelines
Before undertaking any efficiency upgrades:
- Research local historic district regulations and guidelines.
- Consult with your local historic preservation office or commission.
- Understand which features of your home are considered character-defining and must be preserved.
- Familiarize yourself with the Secretary of the Interior’s Standards for Rehabilitation, which often inform local guidelines.
Working with Preservation Experts
To ensure your energy efficiency improvements align with preservation best practices:
- Engage an architect or contractor experienced in historic preservation.
- Consult with energy efficiency specialists who understand the unique challenges of historic structures.
- Consider hiring a preservation consultant to help navigate regulations and develop appropriate solutions.
- Document all changes and maintain records of original features for future reference.
Conclusion
Enhancing the energy efficiency of your historic brick home is a worthy endeavor that requires careful planning and execution. By focusing on non-invasive insulation methods, addressing air leaks sensitively, upgrading windows and doors thoughtfully, incorporating modern HVAC systems carefully, and balancing efficiency with preservation requirements, you can significantly improve your home’s energy performance while maintaining its historic character.
Remember that every historic home is unique, and what works for one may not be suitable for another. Always consult with professionals experienced in both energy efficiency and historic preservation to develop a tailored approach for your beloved brick home. With the right strategies, you can enjoy the charm of the past combined with the comfort and efficiency of the present, ensuring your historic home remains a treasured part of your community for generations to come.
\n\n\nWhat are some energy efficiency challenges of historic brick homes?
Historic brick homes often lack adequate insulation and can have significant air leaks, making them less energy-efficient compared to modern homes.
What non-invasive insulation options are available for brick structures?
Non-invasive insulation options include blown-in insulation (like cellulose, fiberglass, and mineral wool) and interior insulation methods such as rigid foam boards, spray foam, and radiant barriers.
How can homeowners identify air leaks in their historic homes?
Homeowners can identify air leaks through visual inspection, smoke tests, or by using thermal imaging provided by professional energy auditors.
What are some sealing techniques for air leaks in historic homes?
Sealing techniques include using weatherstripping on doors and windows, caulking gaps, installing draft stoppers, and using removable chimney balloons to prevent heat loss.
Should historic windows be restored or replaced for better energy efficiency?
Before replacing, homeowners should consider restoration options like adding weather stripping, installing storm windows, and repairing existing frames to improve energy efficiency while preserving character.
What modern HVAC options are suitable for historic homes?
Energy-efficient HVAC options include ductless mini-split systems, high-velocity systems, radiant floor heating, and geothermal systems, all designed to minimize disruption to historic features.
What should homeowners know about preservation guidelines before making energy upgrades?
Homeowners should research local historic district regulations, consult preservation offices, and understand which features must be preserved according to the Secretary of the Interior’s Standards for Rehabilitation.
How can homeowners ensure proper energy efficiency improvements align with preservation efforts?
It is advisable to work with preservation experts, energy efficiency specialists, and to document all changes made to maintain compliance with historic preservation standards.
What is the overall goal of upgrading energy efficiency in historic brick homes?
The goal is to improve energy performance while maintaining the historic character of the home, allowing for a combination of modern comfort and historical integrity.